
She’s the tattooed plant queen, he’s a gentle giant.
Rares, uncommons, weirdos & the classics.Ask us your plant Q’s! We’ve got answers & dad jokes.
Join us on PalmStreet every Monday for LIVE crazy chat, exciting auctions, and FREE giveaways!Every Monday @ 5:30 EST

Blog Posts
These blogs may contain affiliate links. If you buy through them, I may earn a commission at no extra cost to you.
Top 10 Tropical Plants for Beginners
w/ Care Sheets


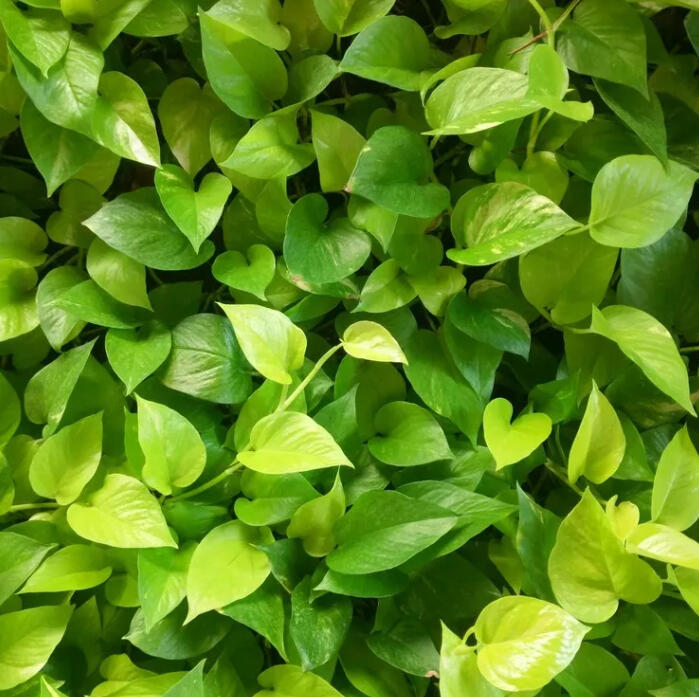
#1 - Golden Pothos – Beginner Care Sheet
• Light: Low to bright indirect light
• Water: Allow top 2 inches of soil to dry between waterings
• Humidity: Average home humidity; tolerant of dry air
• Fertilizer: Feed monthly with balanced liquid fertilizer during growing season
• Beginner Tip: Very forgiving; great for hanging baskets or training on trellises
🌱 Upgrade Cultivar Tip: Manjula or Marble Queen Pothos – slower growing, needs more light to retain variegation

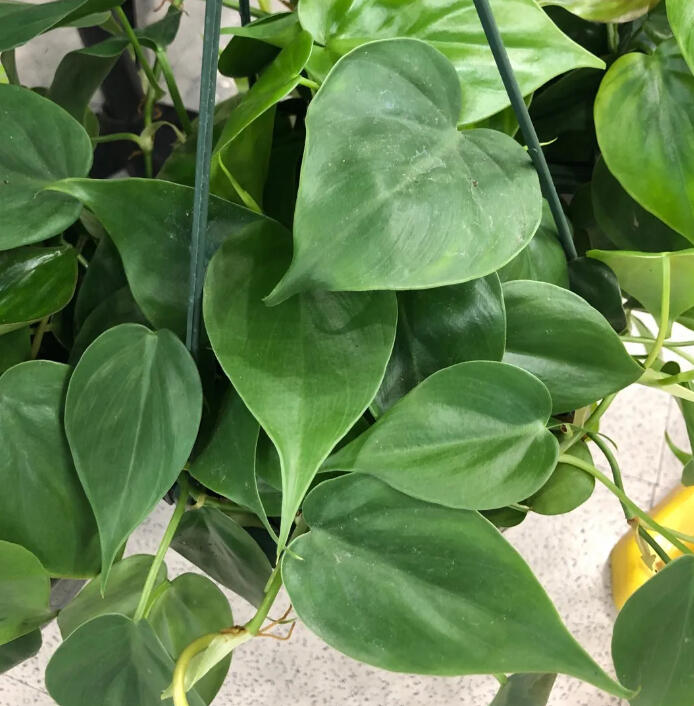
#2 - Heartleaf Philodendron –Beginner Care Sheet
• Light: Low to medium indirect light
• Water: Water when the top 1–2 inches of soil are dry
• Humidity: Moderate; appreciates extra humidity but tolerates average levels
• Fertilizer: Fertilize every 4–6 weeks in spring and summer
• Beginner Tip: Extremely easy to grow; vines quickly and can be trained
🌱 Upgrade Cultivar Tip: Philodendron ‘Brazil’ or ‘Rio’ – slower and more sensitive, needs brighter light

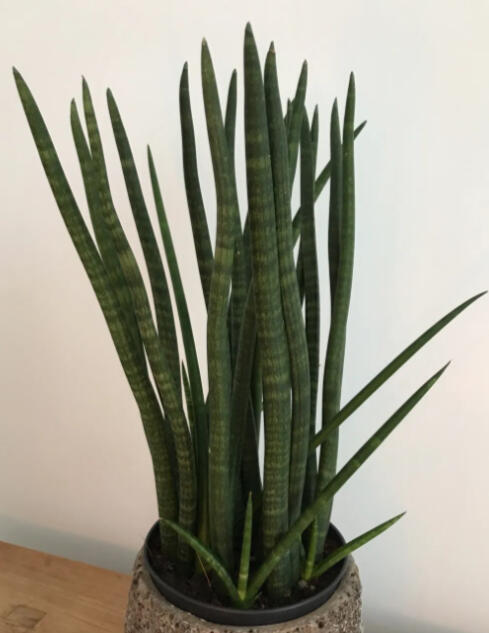
#3 - Snake Plant – Beginner Care Sheet
• Light: Low to bright light; avoid direct sun
• Water: Water only when completely dry (every 2–4 weeks)
• Humidity: Tolerates dry air well
• Fertilizer: Feed sparingly every 2–3 months in growing season
• Beginner Tip: Tough and drought-tolerant; ideal for neglectful plant parents
🌱 Upgrade Cultivar Tip: Moonshine or Whale Fin – needs brighter light, slower growth

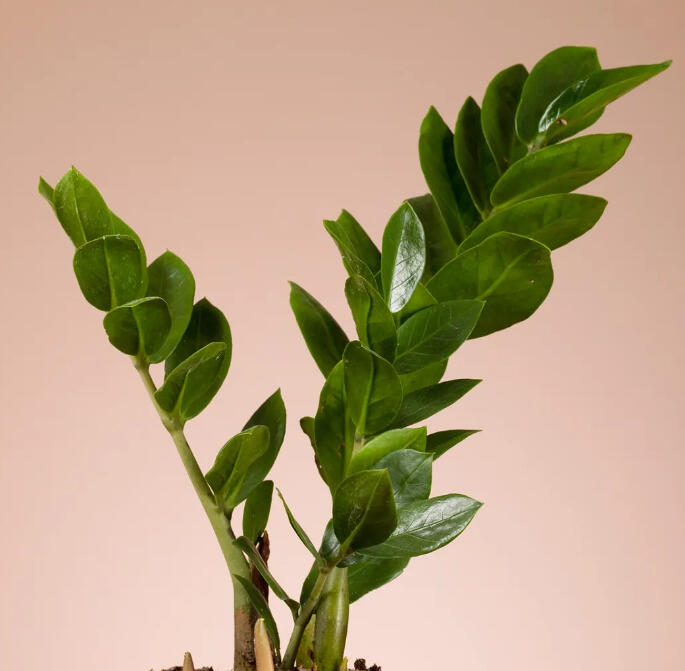
#4 - ZZ Plant – Beginner Care Sheet
• Light: Low to bright indirect light
• Water: Water every 2–3 weeks; allow to fully dry between waterings
• Humidity: Average humidity; not fussy
• Fertilizer: Feed lightly every 2–3 months during growing season
• Beginner Tip: Very low-maintenance; ideal for low light homes or offices
🌱 Upgrade Cultivar Tip: ZZ Raven – slower growing, same care with dramatic dark foliage

#5 Spider Plant – Beginner Care Sheet
• Light: Bright, indirect light
• Water: Keep soil slightly moist; let top dry between waterings
• Humidity: Enjoys moderate to high humidity
• Fertilizer: Feed biweekly in spring/summer
• Beginner Tip: Easily produces baby spiderettes for propagation
🌱 Upgrade Cultivar Tip: Bonnie (Curly) – compact, benefits from more humidity and light

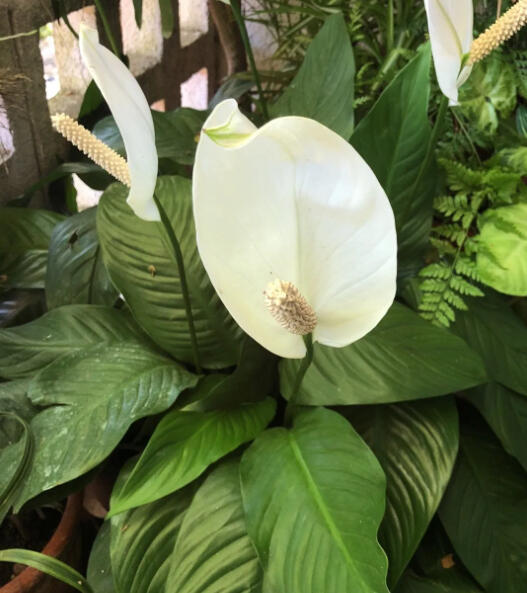
#6 Peace Lily – Beginner Care Sheet
• Light: Low to medium light; blooms better with more light
• Water: Water when leaves start to droop slightly
• Humidity: Prefers high humidity; mist regularly
• Fertilizer: Feed every 6 weeks with bloom-boosting fertilizer
• Beginner Tip: Great communicator—wilts when thirsty
🌱 Upgrade Cultivar Tip: Domino – variegated, needs more consistent light and humidity

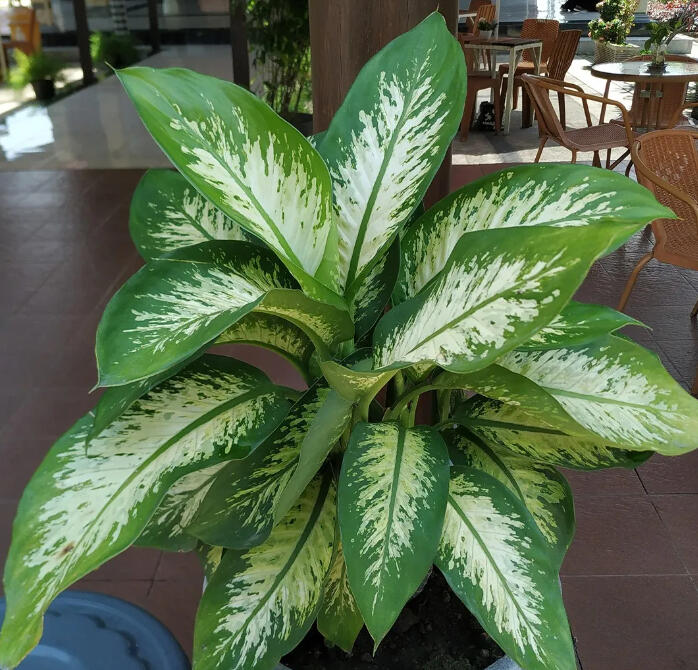
#7 Dieffenbachia – Beginner Care Sheet
• Light: Bright, filtered light
• Water: Keep soil consistently moist but not soggy
• Humidity: Moderate to high humidity
• Fertilizer: Feed every 4–6 weeks during growing season
• Beginner Tip: Rotate regularly for even growth
🌱 Upgrade Cultivar Tip: Reflector or Camille – more sensitive to watering and light changes

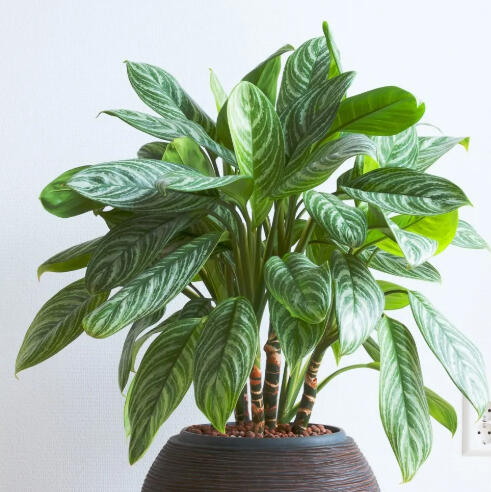
#8 Aglaonema 'Stripe' – Beginner Care Sheet
• Light: Low to medium indirect light
• Water: Water when top 2 inches of soil dry out
• Humidity: Average; appreciates extra humidity for color vibrancy
• Fertilizer: Monthly feeding in spring/summer
• Beginner Tip: Tough and colorful; adapts to various environments
🌱 Upgrade Cultivar Tip: Red Siam or Pink Dalmatian – brighter colors, needs more light

#9 Dracaena – Beginner Care Sheet
• Light: Medium to bright indirect light
• Water: Let soil dry halfway between waterings
• Humidity: Tolerates dry air but prefers moderate humidity
• Fertilizer: Feed every 6–8 weeks in growing season
• Beginner Tip: Sensitive to fluoride—use distilled water if possible
🌱 Upgrade Cultivar Tip: White Jewel or Tornado – more compact, higher humidity preferred

#10 Tradescantia Zebrina – Beginner Care Sheet
• Light: Bright, indirect light
• Water: Keep soil slightly moist; don’t let fully dry out
• Humidity: Loves high humidity
• Fertilizer: Feed every 3–4 weeks during growing season
• Beginner Tip: Pinch back to encourage bushiness and avoid legginess
🌱 Upgrade Cultivar Tip: Nanouk or Tricolor – more vibrant but prone to rot if overwatered
Top 10 Best Tropical Plants for
Low Light Rooms

Tropical plants are often associated with sun-soaked jungles, but not every corner of your home can mimic that level of light. If you're working with a dim bedroom, north-facing office, or a cozy reading nook far from the window, don't worry there are still plenty of lush, vibrant tropical plants that can thrive in low light. The key is choosing the right varieties and adjusting expectations (slower growth, perhaps fewer blooms), while focusing on foliage beauty and resilience.
What is “Low Light,” Really?
Before diving into plant recommendations, let’s define what “low light” means in houseplant terms.
It doesn’t mean no light since very few plants can survive complete darkness.
It refers to areas where: There's no direct sun, and you can comfortably read a book during the day without turning on a light.
Think: several feet away from an east or north-facing window, or rooms with filtered light through sheer curtains.

Now, let’s look at some tropical houseplants that do well in these conditions and a few upgraded cultivars for when you're ready to step up your plant game.
🌱 1. ZZ Plant (Zamioculcas zamiifolia)
Why it works: Practically bulletproof. Tolerates neglect, drought, and thrives in low light.
Care Tips: Let the soil dry completely between waterings. Avoid overwatering at all costs.Upgrade Cultivar:
🪴 ZZ Raven – Sleek black-purple foliage with the same easy care.
Difference in care: Same light tolerance, but slower to show new growth. Bright indirect light will help Raven darken faster.
🌱 2. Snake Plant (Sansevieria trifasciata)
Why it works: Thrives on neglect and very forgiving. It adapts to nearly any light level.
Care Tips: Water sparingly, especially in low light. Too much water is a death sentence.Upgrade Cultivar:
🌾 Moonshine Snake Plant – Stunning silver-green leaves for a more designer look.
Difference in care: Slightly more sensitive to overwatering than the standard variety.
🌱 3. Philodendron hederaceum (Heartleaf Philo)
Why it works: Loves to trail and vine, even in dim corners. It’s a fast grower in most conditions.
Care Tips: Water when top 1–2 inches of soil are dry. Fertilize lightly in spring/summer.Upgrade Cultivar:
💚 Philodendron ‘Brasil’ – Variegated lime and green striped leaves.
Difference in care: Needs slightly brighter indirect light to maintain bold variegation.
🌱 4. Pothos (Epipremnum aureum)
Why it works: A classic for a reason—adapts to low light but thrives in medium.
Care Tips: Water when soil is dry halfway down the pot. Prune leggy vines to encourage bushier growth.Upgrade Cultivar:
💫 Pothos ‘Marble Queen’ or ‘N’Joy’ – Heavier variegation.
Difference in care: Will revert to green in deep shade. Keep near a bright window (no direct sun) to preserve patterns.
🌱 5. Aglaonema (Chinese Evergreen)
Why it works: One of the few tropicals specifically known for its low-light tolerance and splashy foliage.
Care Tips: Water when the top third of soil is dry. Rotate the pot monthly to prevent leaning.Upgrade Cultivar:
🔥 Aglaonema ‘Red Siam’ or ‘Silver Bay’ – Red or silvery variegation.
Difference in care: Slightly brighter light helps maintain rich colors.
🌱 6. Dieffenbachia (Dumb Cane)
Why it works: Large, dramatic leaves with striking patterns. Happy in medium to low light.
Care Tips: Keep soil lightly moist in the growing season, and slightly drier in winter.Upgrade Cultivar:
✨ Dieffenbachia ‘Camille’ – Light creamy center with green edges.
Difference in care: Like others, it prefers filtered light for vibrant color.
🌱 7. Peace Lily (Spathiphyllum)
Why it works: Thrives in low light and even blooms occasionally in shade. Great air purifier, too.
Care Tips: Loves consistent watering—droops dramatically when thirsty but recovers quickly.Upgrade Cultivar:
🌸 Spathiphyllum ‘Domino’ – Variegated white-streaked foliage.
Difference in care: Needs more consistent moisture and slightly brighter light for variegation.
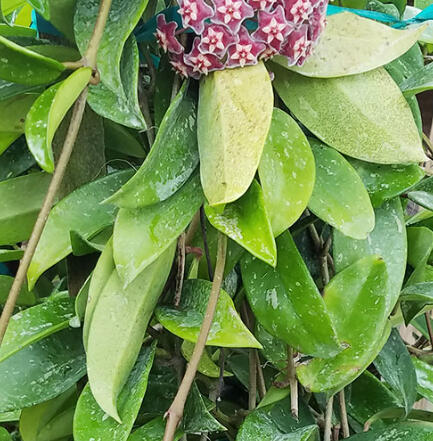
🌱 8. Hoya (especially H. carnosa & H. pubicalyx)
Why it works (surprise!): Hoyas are often thought of as sun lovers, but many species adapt well to low indirect light, just with slower growth and fewer flowers.
Care Tips: Let dry out between waterings. Bright light = blooms, but they survive happily without them.Upgrade Cultivar:
🌺 Hoya ‘Krimson Queen’ – Pink-tinged variegated leaves.
Difference in care: Needs more light to keep the variegation and pink tones strong.
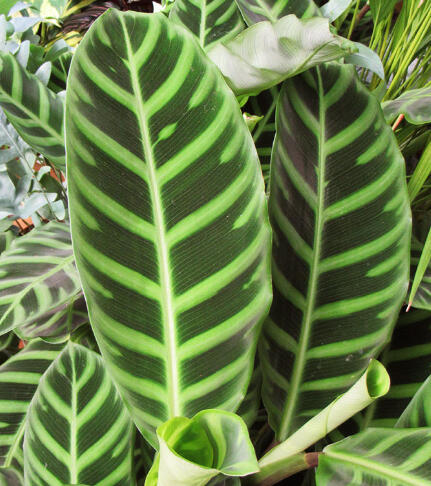
🌱 9. Calathea (Goeppertia)
Why it works: Prefers low, filtered light—too much light can scorch the leaves. Loves humidity.
Care Tips: Use distilled water, keep humidity high, and avoid letting it dry out completely.Upgrade Cultivar:
🎨 Calathea ‘White Fusion’ – A stunning but more temperamental variant.
Difference in care: Requires very high humidity and filtered water; prone to crispy edges.
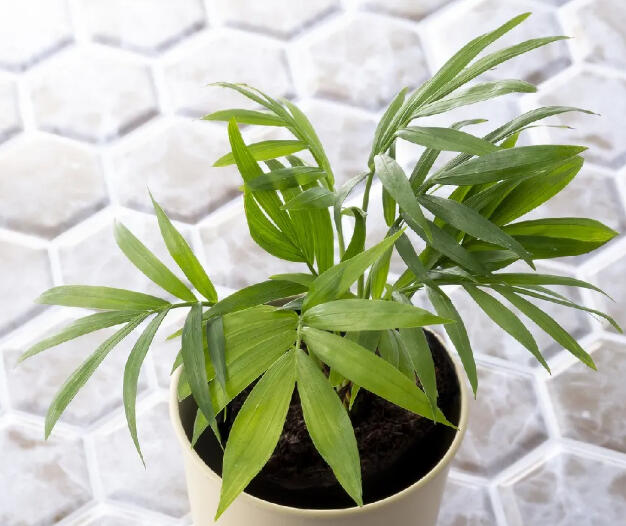
🌱 10. Parlor Palm (Chamaedorea elegans)
Why it works: Classic Victorian houseplant for a reason. Happy in low light and doesn’t require much fuss.
Care Tips: Let topsoil dry out between waterings. Doesn’t love being repotted often.Upgrade Cultivar:
🌿 Cat Palm (Chamaedorea cataractarum) – Similar look, bushier habit.
Difference in care: Needs more frequent watering and brighter light to thrive.
💡Final Tips💡
Low Light Tropical Care
Avoid overwatering: Plants in low light use less water.
Wipe leaves monthly: to help maximize light absorption.
Use grow lights: for really dim rooms.
Turn plants every couple of weeks: This avoids leaning plants.
Dark corners: Add a small mirror to bounce light!
Bonus: Amazon-Recommended Low Light Helpers
🪴 Grow light for shelves or low-light desks:
🌡️ Soil moisture meter (great for low-light plants prone to overwatering):
💧 Humidifier for fussy foliage lovers:
BLOG POST TITLE

Blog Text Body
BLOG POST TITLE

Blog Text Body
BLOG POST TITLE

Blog Text Body
BLOG POST TITLE

Blog Text Body
BLOG POST TITLE

Blog Text Body
Water Quality
&
Its Effects on Houseplants

Tap Water vs. Distilled vs. Rainwater vs. Filtered: What’s Best for Your Plants?
You’ve picked the perfect pot, the ideal soil mix, and found just the right spot by the window. If you’re still watering your beloved tropical houseplants straight from the tap without a second thought you could be sabotaging all your good intentions. Not all water is created equal, and the quality of water you use can have a major impact on the long-term health of your plants.
Let’s break down the different water types, what they contain (or don’t), and how they affect your tropical green companions (especially sensitive ones like Calatheas, Alocasias, and Hoyas).Tap water is easily accessible and convenient, but it often contains chlorine, fluoride, and other dissolved minerals that can accumulate in the soil over time. While many houseplants can tolerate these additives, more sensitive species may show signs of distress (i.e. browning leaf edges or slowed growth). Hard water areas are particularly notorious for high mineral content, which can cause salt buildup and affect soil pH. For plants that already have fussy root systems or thinner leaves, this type of stress can be enough to halt progress or cause long-term damage.Distilled water, on the other hand, is entirely free of minerals, salts, and chemicals. It provides a neutral and predictable base for watering, making it ideal for delicate or rare tropicals. The downside is that it lacks naturally occurring micronutrients found in other water sources, so it’s best used in conjunction with a well-balanced fertilization schedule. Still, for plant parents dealing with sensitive species like Alocasias or rare Calatheas, it’s often a reliable choice to eliminate water-related guesswork.Rainwater is another excellent option (often considered nature’s perfect formula). It’s soft, slightly acidic, and contains trace organic matter that tropicals adore. Collecting rainwater is also environmentally friendly and cost-effective. Just be sure to use a clean collection system and avoid runoff from chemically treated roofs or gutters. Filtered water falls somewhere in between, removing many harmful contaminants while still retaining some beneficial minerals. For most plant parents, this strikes a healthy balance between convenience and quality (especially when using pitcher-style filters or under-sink systems).
In short, while tap water might be “good enough” for some hardy plants, tropical houseplants, particularly finicky varieties, thrive best with a bit more consideration.Upgrading your water source is one of the easiest ways to improve plant health and prevent mystery problems down the road. Once you’ve dialed in your water quality, you might be surprised at how much happier and more resilient your green friends become.
🚿Tap Water: Convenient, but Is It Safe?
Most common option but often the least plant-friendly.🔬 What’s in It?
Tap water contains minerals like calcium and magnesium (which can be beneficial in small amounts), but also additives like chlorine, chloramine, and sometimes fluoride, which can be harmful over time.❌ Common Issues:
Brown tips on leaves (especially on Calatheas and Spider Plants)
Salt and mineral buildup in soil
Sensitive plants may show stress over time.✅ When It’s OK:
Hardy plants like Pothos, Snake Plants, ZZ Plants, and Philodendrons generally tolerate tap water.
Let it sit out for 24–48 hours to allow chlorine to evaporate (this doesn’t work for chloramine, unfortunately).
💦 Distilled Water: Ultra-Pure but Not Nutrient-Rich
Pure H₂O—no minerals, no additives, no contaminants.🔬 What’s in It?
Nothing. Distilled water is created by boiling water into steam and then condensing it back to liquid. It’s as pure as it gets.✅ Pros:
Great for very sensitive plants like Calatheas, Alocasias, Ferns, and Anthuriums
Eliminates the risk of chemical or mineral burn
No residue left in soil or on leaves❌ Cons:
Contains no beneficial minerals
May lead to nutrient deficiencies over time if used exclusively
Cost and accessibility can be a downside for larger collections🪴Best Practice:
Use for sensitive plants or rotate with filtered/rainwater to prevent deficiency. Always fertilize consistently if using distilled long-term.
🌧️ Rainwater: Nature’s Perfect Drink
Free, soft, and nutrient-rich when collected properly.🔬 What’s in It?
Rainwater is naturally soft and often contains organic matter and trace minerals picked up from the atmosphere — which can benefit plants. It’s the closest thing to what your plants would get in the wild.✅ Pros:
Excellent for all tropical houseplants
Contains trace nutrients
Helps flush excess salts from soil
Gentle pH, usually around 5.5–6.5❌ Cons:
Collection required (barrel, bucket, or rain chain setup)
Urban areas may see pollution in rainwater
Needs to be stored safely to avoid mosquito larvae or algae buildup🪴Pro Tip:
Use a mesh screen or fine cloth to filter before storage. Always use food-safe barrels.
🚰 Filtered Water: A Happy Medium
Cleaner than tap, easier than rainwater, and safer than distilled (nutrient-wise)🔬 What’s in It?
Most filters remove chlorine, chloramine, heavy metals, and sediment while often leaving beneficial minerals behind.✅ Pros:
Removes harmful chemicals and metals
Retains essential minerals (in most cases)
Improves water quality without stripping it bare
Available from pitchers (like Brita), under-sink filters, or whole-house systems❌ Cons:
Not all filters remove fluoride
Filter cartridges need to be replaced regularly
Can still get expensive over time🪴Best Practice:
Use filtered water for mid-sensitive plants like Hoyas, Anthuriums, or Monsteras. Great balance between safety and nutrition.
🧪Quick Comparison Chart🧪

🌿Final Thoughts: What’s Right for Your Plants?🌿
Tap water: only if your plants are hardy, or if you let it sit out overnight (and know your local water quality is decent).
Distilled water: is a safe haven for sensitive species, but don’t forget to supplement.
Rainwater: is a plant’s dream drink... just keep it clean and safe.
Filtered water: strikes the perfect balance for most plant parents: better quality, lower risk, and easy to manage.Still not sure what water to use? When in doubt, filtered or rainwater is usually your best bet.
Understanding Light

🌞Understanding Light🌞
Bright Indirect
vs.
Low Light
vs.
Direct Sun
A beginner’s guide to decoding light levels for happy, healthy tropical plants.
When it comes to caring for tropical houseplants, few things are as misunderstood—or as important—as light. While watering and humidity are crucial, getting the lighting right can make the difference between a thriving plant and one that’s just barely surviving. In this article, we’ll break down the three most commonly used terms: bright indirect light, low light, and direct sunlight. We’ll explain what each one really means, how to measure and provide it, and which tropical plants prefer which type. Photos and visual tips are included to make it super clear.
☀️Direct Sunlight☀️
Definition: Light that comes straight from the sun and lands directly on your plant without passing through curtains, blinds, or being reflected off other surfaces.
Where You Find It: South-facing windows (Northern Hemisphere)Outdoor patios, sunrooms, or window sills with no obstructions
Midday sun between 10 AM – 4 PMPros: Best for cacti and succulents. Encourages fast growth in sun-loving plants. Can trigger blooming in light-hungry species
Cons: Can cause leaf burn in most tropical plants. Dries out soil quickly. Increases plant water and nutrient demandTropical Plants That Can Tolerate Some Direct Sun:
Bird of Paradise
Croton
Banana plants (Musa)
Some Alocasias (e.g., Alocasia ‘Regal Shield’)Tips to Manage It:
Use sheer curtains to soften harsh rays
Rotate plants to avoid sun scorch on one side
Move plants back a few feet from the window during summer
🌤 Bright Indirect Light 🌤
Definition: Sunlight that reaches your plant but is filtered through a curtain, bounced off a wall, or diffused naturally before it hits the leaves.
Where You Find It: East-facing windows (gentle morning sun), near (not in) south or west windows, rooms with skylights, frosted glass, or light-colored walls.Pros: Ideal for most tropical houseplants. Mimics understory jungle conditions. Reduces risk of leaf burn
Cons: Can be tricky to gauge without a light meter. May need adjustment during winter.Tropical Plants That Love Bright Indirect Light:
Monstera deliciosa
Philodendrons
Anthurium
Hoya
Calatheas and Marantas
Peace LiliesTips to Achieve It: Hang sheer curtains or blinds, place plant 2–4 feet away from a bright window and use a white wall or mirror to reflect light into darker corners
🌥 Low Light 🌥
Definition: Indirect light that’s far from any window or filtered through multiple barriers. You can still see without turning on a light during the day, but the space may feel dim.
Where You Find It: North-facing windows, rooms with small or shaded windows, corners or hallways away from window and offices with ambient lightingPros: Great for darker homes or winter months, works for tough and adaptable plants and slower growth means less frequent maintenance
Cons: Slower growth rate, increases the risk of overwatering and limited plant selectionTropical Plants That Tolerate Low Light:
ZZ Plant (Zamioculcas zamiifolia)
Snake Plant (Sansevieria)
Pothos (especially Golden and Marble Queen)
Aglaonema (Chinese Evergreen)
Cast Iron Plant (Aspidistra)Tips to Improve It:
Use grow lights during short winter days, clean leaves regularly to improve photosynthesis and rotate plants to expose all sides to any available light.💡Bonus Tip💡
How to Tell What Kind of Light You Have
Test with shadows: Put your hand between the sun and the surface where your plant would sit.Sharp shadow = direct sun
Fuzzy shadow = bright indirect
No defined shadow = low light
Use a light meter: Inexpensive digital lux meters on Amazon can measure light levels in lux.Direct Sunlight: 40,000–100,000 lux
Bright Indirect Light: 10,000–20,000 lux
Low Light: 500–2,500 lux👉 Amazon Recommendation:
Dr. Meter Digital Light Meter – reliable and budget-friendly
How to Measure Light in Your Home

🌞
How to Measure Light in Your Home
🌞Light Meters, Phone Apps, and the Shadow Test
🌞Simplified🌞
One of the most misunderstood - and one of the most important - parts of plant care is understanding light.
Many beginners rely on vague terms like "bright light" or "low light," but those can be hard to visualize.
How do you really know if a corner is "bright indirect"?
Or if your hallway is truly low light?
Luckily, there are simple, beginner-friendly ways to measure the light in your home, using tools you may already have - or possibly a few easy upgrades.
🌤️Why Light Matters🌤️
Plants don’t "see" light the way we do. They measure light intensity and duration to grow, photosynthesize, and even bloom.
If your plant isn’t thriving, too little (or too much!) light is often the reason.Matching your plant to the correct light level helps with:
- Healthy root and leaf growth
- Vibrant colors and variegation
- Flowering (for Hoyas, Peace Lilies, etc.)
- Preventing legginess, stretching, or leaf drop
Method 1: The Shadow Test (No Tools Required!)
The Shadow Test is a fast, surprisingly accurate way to gauge light using only your hand and the sun.Here’s how:
1) Choose the spot where you want to place your plant.
2) Wait for midday light (around 10 AM – 2 PM).
3) Hold your hand or a piece of paper 12 inches above the surface.
4) Observe the shadow cast.Shadow Results:
Strong, sharp-edged shadow = Direct light
Fuzzy, soft-edged shadow = Bright indirect light
No visible shadow = Low light
🪴 Best For: Quick decisions, everyday plant parents
⚠️ Watch Out For: Cloudy days, tinted windows, and blinds can throw this off slightly.
📱Method 2: Light Meter Apps📱
(For Free or Cheap!)
Many smartphones can measure light using their built-in sensors. There are several free or low-cost light meter apps available.
iOS:
“Lux Light Meter Pro”
“Plant Light Meter” by Studio Nano ShipAndroid:
“Lux Meter (Light Meter)” by Crunchy ByteBox
“Photone” – a great all-around app with a “Houseplant Light” modeHow to Use:
Open the app and point the phone camera toward the light source or plant location.
Record the lux (or foot-candle) reading.
Compare to this cheat sheet:

🪴 Best For: Tech-savvy growers, collectors of rare plants
⚠️ Watch Out For: Some phone sensors are less accurate than dedicated meters.
🔦Method 3: Dedicated Light Meters🔦
(Most Accurate)
If you’re serious about houseplants or growing high-light tropicals (like citrus or flowering plants), a dedicated light meter is worth the investment.Recommended Model 📦 Available on Amazon:
Dr. Meter Digital Light Meter (LX1330B)
Reads lux levels in real-time with high precision.
🪴 Best For: Greenhouse setups, grow light calibration, rare plant growers
⚠️ Watch Out For: Most don’t measure color spectrum—just intensity.🕶️Bonus🕶️
Things That Impact Light (You Might Not Realize!)Even if you’ve measured the light once, it’s good to remember:
Seasons change: Winter = less light, lower angle
Curtains, blinds, and screens: filter light dramaticallyWindow direction:
South-facing: Strongest light all day (Northern Hemisphere)
East-facing: Gentle morning sun (great for tropicals)
West-facing: Stronger afternoon sun (hotter!)
North-facing: Cool, low light all day
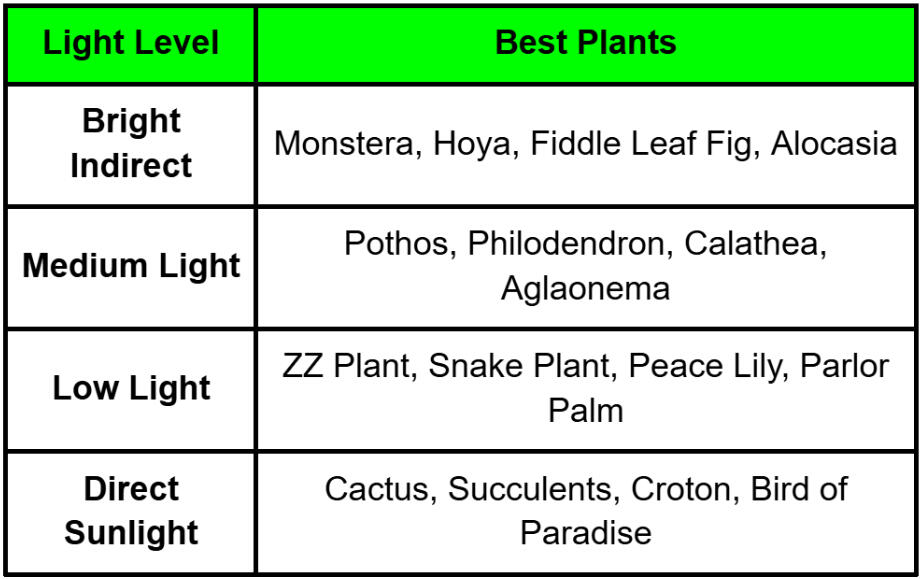
If you're unsure—measure again at different times during the day.🌞Final Tips: Matching Plants to Light Levels🌞
Here’s a quick match-up to help you decide where to place your plant:

Fertilizing Basics
🌿Fertilizing Basics for Tropical Houseplants🌿
This post may contain affiliate links. If you buy through them, I may earn a commission at no extra cost to you.
__How Often? What Kind?
Which Plants Are Heavy Feeders?Tropical houseplants are gorgeous, fast-growing, and vibrant—but all that growth requires fuel. That’s where fertilizer comes in. Just like humans need balanced meals, tropical plants need a steady supply of nutrients to maintain lush leaves, vibrant colors, and new growth. But not all plants eat the same, and too much of the wrong kind of fertilizer can do more harm than good.
This guide will walk you through how often to fertilize, which type of fertilizer works best for each plant family, and which of your plants are hungriest for nutrients.
🌱Why Fertilizing Matters🌱
Most potting soil contains a small nutrient reserve, but it’s quickly depleted—especially for tropicals in active growth phases. Fertilizer replaces these spent nutrients, delivering nitrogen (N), phosphorus (P), and potassium (K), as well as micronutrients like calcium, magnesium, and iron.
When done right, you’ll see:
Faster & fuller growth
Brighter & healthier foliage
More resistance to disease and pests
📅How Often Should You Fertilize?📅
Seasonal Fertilizing Frequency
Spring & Summer - Every 2–4 weeks (active growth)
Fall - Every 4–6 weeks or reduce dose
Winter (Dormant) - Stop or once every 6–8 weeks
Pro Tip: Always water your plant first, then fertilize. Fertilizing dry soil can lead to root burn.
🧬Fertilizer by Plant Family🧬
🌿Araceae (Philodendron, Monstera, Alocasia, Pothos, Anthurium)🌿
These are moderate to heavy feeders that like a balanced fertilizers with a bit of extra nitrogen.
Recommended Fertilizer:
✅ Dyna-Gro Grow 7-9-5 Liquid Plant Food – A cult favorite in the houseplant world for steady foliage growth.
Frequency: Every 2–4 weeks during growing season
Special Note: Alocasia and Anthurium love calcium and magnesium - consider adding Cal-Mag monthly.
✅ Botanicare Cal-Mag Plus
🌸Gesneriaceae (African Violet, Episcia)🌸
These bloomers need phosphorus for flowers and potassium for root health!
Recommended Fertilizer:
✅TPS NUTRIENTS African Violet Fertilizer – Great for flowering tropicals.
Frequency: Every 2–3 weeks during blooming phase
Special Note: Avoid foliar feeding—these plants dislike moisture on their leaves.
🍃Apocynaceae (Hoya)🍃
Hoyas are light feeders but bloom best with a high-phosphorus formula.
Recommended Fertilizer:
✅ Jack’s Classic Blossom Booster 10-30-20 2pk – Promotes stunning blooms.
Frequency: Monthly when not blooming; biweekly during bloom season.
Special Note: Flush soil every 6–8 weeks to avoid salt buildup.
🐍Marantaceae (Calathea, Prayer Plant, Stromanthe)🐍
These plants are sensitive to chemical buildup, so go gentle and use diluted feed.
Recommended Fertilizer:
✅ Espoma Organic Indoor Plant Food (2-2-2) – Gentle and organic.
Frequency: Every 3–4 weeks
Special Note: Use filtered or distilled water to avoid leaf damage.
🍃Piperaceae (Peperomia)🍃
These plants are low feeders—too much fertilizer can cause leaf burn or legginess.
Recommended Fertilizer:
✅ Liquidirt All-Purpose Plant Food – Very low risk of overfertilizing; great for beginners.
Frequency: Every 4–6 weeks
Special Note: Skip fertilizing in winter entirely.
🍂Outlier Family: Araliaceae (Schefflera, Dizygotheca)🍂
These need more potassium and can grow quickly with the right feeding.
Recommended Fertilizer:
✅ Schultz All Purpose Plant Food 10-15-10
Frequency: Every 2–3 weeks.
Special Note: Great option for faster bushy growth.
🧠Quick Tips for Fertilizing Success🧠
Less is more: Always start at half-strength if you're unsure.Observe your plant: Pale leaves? Might need nitrogen.
No new growth? Might need a boost.
Use slow-release fertilizer for convenience:
✅ Osmocote Smart-Release Plant Food – Lasts 3–4 months.
🪴Wrap-Up: Feed to Thrive🪴
Fertilizing tropical houseplants isn’t one-size-fits-all. Each plant family has different needs—but when you match the right fertilizer with the right plant, you unlock their full potential. From glossy philodendron leaves to blooming hoyas and vibrantly striped calatheas, the results are well worth the effort.
Fertilizing Advanced

🌿Fertilizing Advanced🌿
🌿Feeding the Fussy🌿Additives & Special Care for Variegated Tropical Houseplants (Low-Chlorophyll Cultivars)
Some of the most breathtaking tropical houseplants aren’t just green—they’re marbled, speckled, or boldly white. Cultivars like Monstera albo, Monstera Thai Constellation, Philodendron White Knight, and Philodendron Pink Princess are absolute showstoppers. But beauty comes at a price—those pale or white leaf (pretty much anything except green) sections contain little to no chlorophyll, which means less photosynthesis and less energy production. This makes them more vulnerable to stalling, yellowing, sunburn, and root stress. Thankfully, the right nutrient strategy—plus a few carefully chosen additives—can support their growth and maintain those dreamy variegation patterns.
🌱Why Low-Chlorophyll Plants Need Extra Support🌱
Because these plants have reduced energy-making ability, they:
- Grow more slowly than their all-green counterparts
- Are more sensitive to environmental changes
- Are prone to leaf yellowing, especially in white sections
- May struggle with root rot or stunted roots due to slower nutrient uptakeThat’s why consistent micronutrient support, calcium-magnesium balance, and root-stimulant additives can make a world of difference.
💊Additives to Support Growth & Health💊1. Cal-Mag (Calcium + Magnesium Supplement)
These two nutrients help strengthen cell walls and assist with chlorophyll synthesis in the green parts of the plant—crucial for low-chlorophyll plants trying to photosynthesize more efficiently.
✅ Amazon Pick: Bloomcity Cal-Mag Pro – A favorite among aroid collectors.
Use: Once a month (or biweekly at half strength) during active growth
Pro Tip: Add Cal-Mag after watering—not on dry soil—to prevent root stress.
2. Silica (Si) Additive
Silica strengthens plant cell walls, helping support leaves and stems that may grow thin or weak due to slow development. It also improves resistance to pests and stress.
✅ Amazon Pick: General Hydroponics Armor Si
Use: Every 3–4 weeks in small doses
Pro Tip: Add to water before other nutrients for best absorption.
3. Root Stimulators & Beneficial Bacteria
Root boosters can help slow-growing plants develop a stronger underground system, improving nutrient uptake and overall health.
✅ Amazon Pick: Great White Mycorrhizae – High-quality blend of beneficial microbes.
Budget option: FoxFarm Bush Doctor Kangaroots
Use: Monthly root drench or add during repotting
Bonus: Helps prevent root rot and enhances soil biology.
4. Iron (Fe) Supplement
If your variegated plant’s green areas are looking pale or yellowing (especially in new growth), it may be due to iron deficiency, which is more common in low-chlorophyll plants.
✅ Amazon Pick: Liquinox Iron & Zinc Micronutrient Blend
Use: Every 6–8 weeks at half strength
Pro Tip: Especially useful for White Knight, Pink Princess, and Thai Constellation and other high varigation plants.
5. Seaweed/Kelp Extract
Seaweed contains natural growth hormones, minerals, and enzymes that stimulate healthy development, improve stress resistance, and even help with root recovery after shipping or repotting.
✅ Amazon Pick: Maxicrop Liquid Seaweed
Use: Every 3–4 weeks as a foliar spray or soil drench
Bonus: Helps boost sluggish variegated plants without overfeeding
🧠Best Practices for Low-Chlorophyll Cultivars🧠
Avoid Overfertilizing: These plants can't process high-nitrogen fertilizers as efficiently. Stick with low- to moderate-NPK formulas.
Rotate Regularly: Ensure even light exposure to prevent variegation fade or all-green reversion.
Provide Bright Indirect Light: Too little light = less energy; too much = leaf burn. Use sheer curtains or grow lights for balance.
Monitor New Leaves: Fully green leaves indicate low light or nutrient imbalance. Fully white leaves may be weak and short-lived.🌈Examples of Variegated VIPs🌈
Plants That Benefit from These Additives
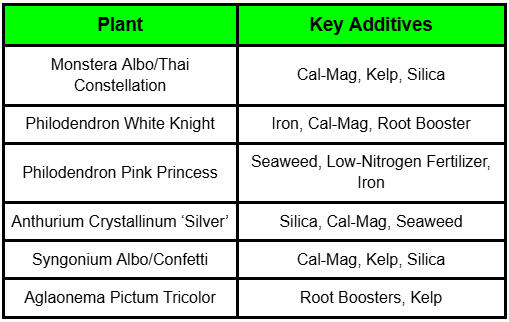
🪴Wrap-Up: Baby Your Variegated Beauties🪴
These plants are some of the divas of the tropical houseplant world—but their dramatic beauty is worth the extra care. By incorporating key additives like Cal-Mag, silica, root stimulators & beneficial bacteria, iron and/or seaweed extract you can ensure these low-chlorophyll cultivars grow strong, stable, and strikingly beautiful.
The Truth About LECA, Perlite and Pumice

The Truth About:
LECA, Perlite, and Pumice
LECA, Perlite, and Pumice:
Pros, Cons, and How to Use Them for Happy Tropical PlantsWhen it comes to potting tropical houseplants, choosing the right substrate isn’t just about dirt — it’s about science. LECA, perlite, and pumice are three of the most commonly used materials to improve aeration, drainage, and root health. But they’re not interchangeable, and each has its own quirks. This guide breaks down the pros and cons of each, plus how (and when) to use them.
🪨What Is LECA?🪨
(Lightweight Expanded Clay Aggregate)
LECA consists of baked clay balls that are porous and lightweight. It's a favorite among hydroponic and semi-hydroponic growers.
✅ Pros:
- Excellent for root aeration
- Reduces the risk of root rot due to consistent moisture without saturation
- Reusable (sterilize between uses)
- Minimal mess❌ Cons:
- Not nutrient-rich — must supplement with hydroponic nutrients
- Requires monitoring of pH and EC (electrical conductivity)
- Not great for moisture-loving plants that prefer consistently damp soil
- Setup can be intimidating for beginners🪴Best Uses🪴
Semi-hydroponic setups
Great for Hoyas, Monsteras, and Philodendrons with mature root systemsHow to Use:
- Rinse thoroughly to remove clay dust.
- Soak for 24 hours before use.
- Use in a net pot or container with a reservoir (passive hydroponics).
- Add liquid nutrients to the reservoir.💡Recommended Products💡
LECA Clay Pebbles - 2L Bag
General Hydroponics Nutrient Trio+cal/mag
🌀 What Is Perlite?
Perlite is a white, puffy volcanic glass that's been heat-expanded. You’ve probably seen it already in most commercial potting soils.✅ Pros:
- Very lightweight and inexpensive
- Improves drainage and aeration
- Prevents soil compaction
- Inert and pH-neutral❌ Cons:
- Can float to the top of the soil
- Extremely dusty (wear a mask while handling)
- Not reusable
- Not aesthetically pleasing (can look artificial)🪴Best Uses🪴
- Mixed into soil to improve drainage
- Works well for Aroids, Alocasias, and general tropicals🔧How to Use🔧
1) Mix 10–30% perlite into your potting mix.
2) Use gloves and a mask to avoid inhaling dust.
3) Water thoroughly after repotting to help settle the perlite.💡Recommended Products💡
Miracle-Gro Perlite - 8qt
Espoma Organic Perlite - 8qt
🪨What Is Pumice🪨
Pumice is a naturally occurring volcanic rock that, like perlite, helps with aeration and drainage—but it’s heavier and more durable.
✅ Pros:
- Heavier than perlite, so it stays in place
- Does not break down over time
- Provides trace minerals like calcium and magnesium
- Natural-looking, blends well with other substrates❌ Cons:
- More expensive than perlite
- Heavier to ship and handle
- Not as readily available in big-box stores🪴Best Uses🪴
- High-quality chunky mixes for rare aroids and succulents
- Great for root-bound or overwatered plants🔧How to Use🔧
1) Add 15–30% pumice to your potting mix.
2) Can also be used alone in a very well-draining setup (for succulents).
3) Rinse before use to remove dust or debris.💡Recommended Products💡
Pumice - Fine
Pumice - Course
📊Side-by-Side Comparison📊

🌿Final Thoughts🌿
If you’re a beginner looking for easy drainage, perlite is a great place to start. Want something more natural and long-lasting? Try pumice. If you're ready to experiment with hydroponics and nutrient regimens, LECA is your go-to. Just remember—no matter the substrate, your plant’s needs come first.
Humidity Hacks

Humidity Hacks
🌿Indoor Plants🌿
Easy Ways to Boost Humidity Without Breaking the Bank
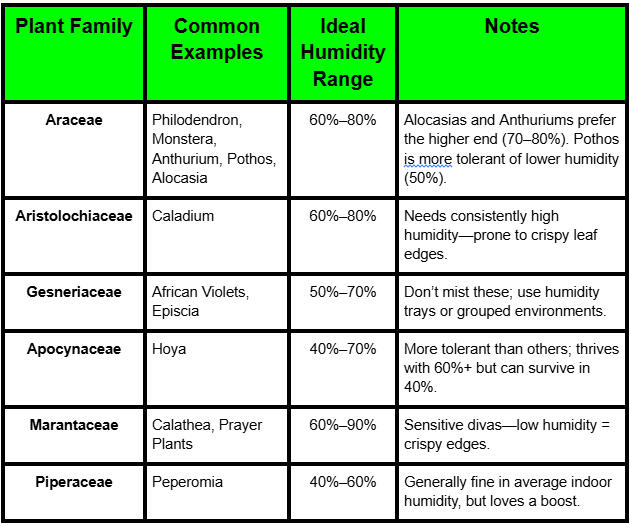
Tropical houseplants are beloved for their bold foliage, exotic growth patterns, and lush, jungle-like aesthetic. But bringing these beauties indoors means recreating a bit of the tropics - and that starts with humidity. Most tropical plants hail from rainforests, where humidity often ranges from 60% to 90%. Unfortunately, indoor environments (especially with AC or heat running) often hover around a much drier 30%–40%. This article will show you exactly how to bridge that gap—with simple, affordable solutions and no need for expensive gadgets.
🧪 Recommended Humidity Levels by Plant Family🧪
Knowing your plant’s native environment helps guide your care, especially when it comes to moisture in the air. Here’s a breakdown of the most common tropical plant families:
💨 Budget-Friendly Humidity Hacks1. Group Your Plants Together
Plants naturally release moisture through transpiration. When grouped, this creates a microclimate with elevated humidity around them.
Tip: Place humidity lovers like Alocasia or Calathea in the center of the group to benefit the most.
2. Use a Pebble Tray
Fill a shallow tray with water and pebbles, then place your plant pot (not sitting in water) on top. As the water evaporates, it increases humidity right around the plant.
✅ Amazon Item Suggestion:
Humidity Tray with Pebbles – Lightweight, reusable, and ideal for plant shelves.
3. DIY Mini Greenhouse
Clear plastic storage bins or glass domes can be transformed into a budget-friendly greenhouse. Just prop the lid slightly open for airflow or keep closed for close to 100% humidity.
✅ Amazon Item Suggestion:
Clear Stackable Storage Bins – Choose the size that fits your plant and pop the lid for airflow. The bins with gasketed lids are preferred for complete humidity control.
4. Place a Room Humidifier
Small ultrasonic humidifiers can add 10%–30% humidity to a room, especially if used near plants. Just be sure not to aim it directly at the leaves for long periods.
✅ Amazon Item Suggestion:
GoveeLife Smart Humidifiers 6L – Quiet, compact, and perfect for a plant corner.
Budget pick: GoveeLife Smart Humidifiers 3L
5. Decorate with Open Water
Place open bowls or vases of water around your plant shelf. As the water evaporates, it adds subtle humidity. Bonus: they double as aesthetic decor!
✅ Amazon Item Suggestion:
Glass Cylinder Vase Set – Add some river stones for a beautiful touch.
6. Dry Laundry Nearby (not perfect but...)
This might sound odd, but hanging damp clothes or towels near your plant area is a zero-cost way to raise the humidity by a few percentage points.
Perfect for winter when indoor air is extra dry!
7. Use a Misting Routine(With Caution)
Misting can temporarily boost humidity, but it’s best done in the morning and only for plants that like moisture on their leaves (like ferns and calatheas). Avoid misting plants prone to fungal issues or with fuzzy leaves (like African violets or peperomia).
✅ Amazon Item Suggestion:
Continuous Fine Mist Spray Bottle - Gives a salon-quality mist for even coverage.
🧠 Bonus Tips 🧠
Track Your Humidity! Knowing your baseline is the first step.
✅Digital Hygrometer 2-Pack - Inexpensive, reliable, and can be placed around different plant zones.Boost during winter or AC season. These are the driest times of the year, so consider rotating in higher humidity plants to kitchens or bathrooms where moisture lingers.
🌱 Final Thoughts 🌱
Raising humidity doesn’t have to mean buying an expensive greenhouse or industrial humidifier. Whether you go for a $10 misting bottle or group your plants for their own little rainforest club, small efforts go a long way toward lush, healthy foliage. Your philodendrons, hoyas, alocasias - and yes, even the finicky calatheas - will thank you.
DIY Tropical Plant Soil

🪴DIY Tropical Plant Soil🪴NOTE: It seems that every collector has their own specific mixture that they prefer to use. These are the ones that we prefer to use. Don’t be afraid to experiment with other mixes and develop your own.
🪴Aroids🪴
(For Monstera, Philodendron, Anthurium, Epipremnum, and Syngonium)
Aroids are beloved for their beautiful foliage and dramatic growth, but they also share a key trait underground—their roots thrive in loose, chunky, and well-aerated substrates. Native to rainforest floors and tree canopies, these plants hate sitting in soggy soil. The right mix helps avoid root rot, supports strong growth, and mimics their natural environment.🧪Recommended Aroid Soil Mix🧪
Classic Aroid Mix (Soil-Based):
Note: This is not our recommended medium for aroids
40% High-quality potting soil (like Espoma Organic Potting Mix)
30% Orchid bark (fine to medium chunks)
15% Perlite or pumice
10% Coco coir (hydrates and adds moisture retention)
5% Activated charcoal (for odor & toxin control)
Optional Boosters:
A handful of worm castings or slow-release fertilizer granules (such as Osmocote)🪴Soilless Aroid Mix🪴
(Ideal for collectors or rarer cultivars)
40% Sphagnum moss (long fiber)
30% Fine-grade orchid bark
20% Perlite or pumice
10% Horticultural charcoal🌱 Ideal Plants for These Mixes🌱
Philodendron: Pink Princess, Gloriosum, White Knight, Micans, Brasil
Monstera: Deliciosa, Adansonii, Thai Constellation
Anthurium: Clarinervium, Crystallinum, Forgetii
Pothos / Epipremnum: Golden Pothos, Marble Queen, Cebu Blue
Syngonium: Podophyllum, Pink Splash, Confetti🛒 Where to Get Your Supplies 🛒Organic Potting Mix
Orchid Bark
Perlite
Coco Coir Bricks
Horticulture Charcoal
Long Fiber Sphagnum Moss
Worm Castings💡Pro Tips💡
Always pre-moisten your mix before potting up.
Mix in a large tub and store leftovers in a sealed container.
For rare aroids, err on the side of more aeration.
If your home is very humid, cut back on moisture-retaining ingredients like coco coir or moss.
🌱Hoyas🌱
For Hoya carnosa, pubicalyx, obovata, compacta, kerrii, linearis, and more
Hoyas—sometimes called “wax plants”—are epiphytic or semi-epiphytic climbers that hail from Southeast Asia and Australia. These tropical beauties love to stretch out their roots in open, airy mediums, not dense or soggy soil. A well-draining, semi-hydro mix is often ideal and can help these plants thrive and bloom.🧪Recommended Hoya Soil Mix🧪
Classic Hoya Mix (Soil-Based):
30% Cactus or succulent mix (or Espoma Cactus Mix)
30% Orchid bark (medium-grade)
20% Perlite or pumice
10% Coco coir or coconut chips
10% Horticultural charcoalThis mix retains a little moisture but prioritizes fast drainage—ideal for most carnosa and pubicalyx types.🫧Soilless Hoya Mix🫧
(Preferred for rare/hard-to-root varieties)
40% LECA or chunky perlite
30% Orchid bark
20% Sphagnum moss (or coco husk)
10% CharcoalThis is ideal for Hoya linearis, serpens, or cultivars like Hoya Callistophylla that are sensitive to overwatering. You can also root Hoyas directly in semi-hydro systems (like LECA) with nutrient water reservoirs and great results.🌱Hoyas That Love These Mixes🌱
Easy growers: Hoya carnosa, compacta, pubicalyx, krimson queen, tricolor
Rare types: Hoya linearis, curtisii, callistophylla, serpens, polyneura, deykei
Variegated forms: Krimson Princess, Variegated Wayetii🛒Where to Get Your Supplies🛒
(Amazon picks for easy shopping)
Espoma Cactus Mix
Orchid Bark
LECA Clay Pebbles
Perlite
Coconut Chips
Horticulture Charcoal
Long Fiber Sphagnum Moss💡Pro Tips💡
Don’t compact your Hoya mix—these roots love oxygen.
Use clear nursery pots so you can watch the root system and moisture level.
Fertilize lightly during the growing season for optimal blooms.
Let the soil dry out almost fully before watering, especially in winter.
Alocasias
For Alocasia Polly, Frydek, Maharani, Dragon Scale, Silver Dragon, and other jewel and elephant ear types
Alocasias are dramatic tropical plants prized for their striking leaves and sculptural form. But they’re also a bit notorious for being finicky — especially when it comes to their soil. The right mix can prevent root rot, promote healthy corm development, and support their preference for bright humidity without suffocating roots.🧪Recommended Alocasia Soil Mix🧪
Note: This is not our recommended medium for aroids
Alocasia Chunky Moisture-Balanced Mix:
30% High-quality potting soil (FoxFarm or Happy Frog preferred)
25% Orchid bark (medium to fine grade)
20% Perlite (or pumice)
15% Coconut coir (or finely shredded coco chips)
10% Worm castings or compost
This blend strikes a balance between moisture retention and airflow, ideal for most Alocasia species, especially Polly and Amazonica.🌱Recommended Alocasia Soilless Mix 🌱
Corm, Jewel Varieties and all other alocasia varieties40% Orchid Bark Mulch
20% Chunky Perlite
20% Coconut chips or Coco Coir
10% Worm Castings
10% Charcoal
This soilless mix is perfect for rooting Alocasia corms or supporting sensitive jewel varieties that dislike wet feet but still need humidity.Alocasias That Thrive in These Mixes
Common types: Alocasia Polly, Amazonica, Zebrina, Regal Shield
Jewel types: Silver Dragon, Dragon Scale, Maharani, Black Velvet
Large-leaf varieties: Odora, Portodora, Sarian, Macrorrhiza🛒Amazon Picks for the Perfect Mix🛒
FoxFarm Ocean Forest Potting Soil
Orchid Bark
Coarse Perlite
Coconut Coir Brick
Sphagnum Moss
Worm Castings
Horticultural Charcoal🪴Alocasia Soil Tips for Beginners🪴
Never let Alocasia sit in soggy soil – drainage is essential.
Water only when the top 2–3 inches of soil are dry.
If your home is dry, consider adding moss around the base or placing the pot on a pebble tray.
These plants love heat and humidity—aim for 60%+ and warm temps.
In winter, reduce watering and expect some leaf drop (dormancy is normal).
Seasonal Tropical Plant Care Checklist

Blog Text Body
Comprehensive Anthurium Care
and
Propagation Guide
With 3 Bonuses

Comprehensive Anthurium Care & Propagation Guide
1. Overview of Anthuriums
Anthuriums, often referred to as "Flamingo Flowers" or "Painter’s Palette," are tropical plants celebrated for their vibrant, glossy spathes and exotic foliage. They belong to the Araceae family, which also includes philodendrons and alocasias, and are prized both as ornamental houseplants and as cut flowers in floral arrangements. With their bold shapes and colors, anthuriums add a dramatic tropical flair to any collection.
Native to the rainforests of Central and South America - particularly Colombia, Ecuador, and Panama - anthuriums have adapted to warm, humid, and filtered light environments. In the wild, many species grow epiphytically, clinging to trees and absorbing moisture from the air, though others are terrestrial or lithophytic. The genus includes over 1,000 recognized species, ranging from the well-known Anthurium andraeanum, cultivated primarily for its flowers, to velvet-leaved foliage types like Anthurium crystallinum, warocqueanum, and papillilaminum, which are coveted by collectors.
Whether grown for their flowers or foliage, anthuriums are appreciated for their year-round appeal, their relatively long blooming cycles, and their increasingly diverse hybridization potential. As interest in rare houseplants has grown, so too has the popularity of anthuriums—transforming them from simple gift-shop novelties into stars of the tropical plant world.
2. Light Requirements
Anthuriums thrive best in bright, indirect light, which closely mimics the dappled sunlight they receive in their natural rainforest habitat beneath a canopy of trees. Direct sunlight, especially through uncovered south-facing windows, can easily scorch their delicate leaves, causing browning, dryness, or even permanent damage. On the other hand, placing anthuriums in overly shaded areas—such as dark corners or rooms with limited natural light—can result in slow growth, elongated stems, and little to no flowering.
For optimal growth, a spot near an east- or west-facing window with filtered sunlight works well. Sheer curtains, frosted glass, or diffused grow lights can also help maintain the ideal lighting balance. Leafy, dark green varieties (like A. warocqueanum or A. magnificum) can typically tolerate slightly lower light conditions, though their growth may slow. In contrast, variegated or lighter-colored varieties need higher light levels to maintain their coloration and stay compact. Without sufficient light, variegation may fade or disappear altogether.Signs of Poor Lighting Conditions:
Yellowing Leaves: This can indicate either insufficient light or light that’s too harsh. If leaves appear sunburned or crispy, reduce exposure to direct sun.
Leggy or Elongated Stems: A clear sign the plant is stretching toward the light, often due to a dim environment.
Lack of Flowers: Anthuriums grown for their blooms, such as A. andraeanum, require adequate light to consistently produce inflorescences.
If natural light is lacking, full-spectrum grow lights (set on a 10 – 12 hour cycle) can supplement effectively, especially in winter months or indoor environments with limited window access. Sansi and Barrina are our most recommended brands.
3. Watering Needs
Anthuriums prefer consistently moist - but never soggy - soil. A good rule of thumb is to water when the top 1–2 inches of the potting mix feels dry to the touch. These tropical plants originate from humid rainforest conditions where their roots are exposed to regular moisture and airflow, not stagnant or oversaturated soil. Overwatering is one of the most common causes of root rot and yellowing leaves, so it’s better to err slightly on the dry side than to keep the plant constantly wet.
During the active growing season (typically spring through early fall), anthuriums may require more frequent watering, especially if kept in a warm environment or a loose, chunky substrate. In cooler months or when growth slows, reduce watering to match the plant’s decreased metabolic needs. Always ensure your pot has good drainage - standing water at the bottom of the container can quickly lead to problems, even if you're watering on schedule.Pro Tip:
Anthuriums can be sensitive to the chemicals commonly found in tap water, especially chlorine, chloramine, and fluoride. Over time, these substances can cause browning on leaf tips and slow overall growth. To protect your plant, use filtered, distilled, or collected rainwater whenever possible. Letting tap water sit out overnight can also help some of the chlorine dissipate. If you want to learn more about water quality, check out our blog post on it!!Extra Tip for Humidity Lovers:
While soil moisture is important, so is atmospheric humidity. If your anthurium’s leaves start to curl or develop dry edges, it may be a sign that the air is too dry—even if you’re watering correctly. Use a humidifier, humidity tray, or group plants together to create a more favorable environment. Here is a link to our blog on Humidity Hacking.
4. Humidity & Temperature
Anthuriums are native to the warm, humid rainforests of Central and South America, so they naturally thrive in environments with humidity levels between 60–80%. In the average home, humidity often falls below this range—especially during winter months when heaters are running—which can lead to crisping leaf edges, reduced growth, or stalled flowering. Increasing humidity around your plant is one of the most effective ways to keep it looking lush and healthy.
Several easy methods can help boost humidity levels. Placing your anthurium on a pebble tray filled with water, grouping it near other tropical plants, or running a cool-mist humidifier nearby can make a significant difference. While occasional misting may provide a temporary boost, it doesn't create sustained humidity and can increase the risk of fungal issues on leaves if done too often or in poor airflow. Still, misting can be useful in moderation, especially on hot days or to clean dust off foliage.
In terms of temperature, anthuriums prefer a steady range between 65–80°F (18–27°C). These plants are not cold-tolerant and should be kept away from drafty windows, air conditioners, or any area where temperatures may drop below 55°F (13°C). Sudden temperature swings can cause shock, leaf drop, or stunted growth. Maintaining consistent warmth and humidity mimics their natural environment and supports long-term vitality.
If you're growing your anthurium outdoors in warm months, make sure to bring it inside well before temperatures begin to dip in fall. Likewise, avoid placing them near heating vents or radiators, which dry out both the air and the plant.
Optimal humidity: 60–80%
Ideal temperature range: 65–80°F (18–27°C)
A combination temperature and humidity gauge makes it much easier and safer to track and measure both parameters.
5. Soil & Potting Mix
Anthuriums are epiphytic or semi-epiphytic in nature, meaning they often grow on trees or rocky surfaces in the wild rather than in dense soil. Because of this, they thrive in an airy, chunky, and well-draining potting mix that allows oxygen to reach the roots while still retaining some moisture. A dense or compacted soil will quickly lead to problems like root rot, fungus gnats, and slowed growth.
The ideal anthurium substrate mimics conditions found in their natural rainforest habitat: loose, breathable, and rich in organic matter. Think of it more as a “root support system” than traditional soil. You’ll often hear growers refer to “aroid mixes,” which are blends designed for plants in the Araceae family—Anthuriums, Philodendrons, and Monsteras included.
Suggested Mix for Anthuriums:
Classic Aroid Mix (Soil-Based):
40% High-quality potting soil (like Espoma Organic Potting Mix)
30% Orchid bark (fine to medium chunks)
15% Perlite or pumice
10% Coco coir (hydrates and adds moisture retention)
5% Activated charcoal (for odor & toxin control)
Classic Aroid Mix (Soilless):
40% Sphagnum moss (long fiber)
30% Fine-grade orchid bark
20% Perlite or pumice
10% Horticultural charcoal
Optional Boosters for either mixture:
Worm castings or slow-release fertilizer granules (such as Osmocote)
When repotting, always choose a pot with drainage holes and size up only slightly—too large a container can trap excess moisture and overwhelm the roots.
6. Fertilizing
To keep your anthurium healthy and thriving, regular fertilization during the growing season is key. These plants are not heavy feeders, but they do benefit from a consistent, balanced nutrient supply to support lush foliage and, in some varieties, flower production. The active growth period typically spans from spring through early fall, when warmth and light levels encourage the plant to put out new leaves and roots.
A liquid fertilizer is usually best, as it allows for easy dilution and even nutrient distribution. Apply fertilizer every 2 to 4 weeks during this time, depending on your plant’s size, light exposure, and growth rate. Always follow the product’s dilution instructions - or go slightly weaker than the recommended dose to avoid salt buildup in the soil.
Check out our blogs on Fertilizing Basics and Advanced Fertilizing options.Recommended Fertilizer:
✅ Dyna-Gro Grow 7-9-5 Liquid Plant Food - A favorite among aroid collectors, this well-balanced formula encourages steady, even growth without overwhelming the plant. It includes micronutrients and is especially effective for foliage-heavy species like A. crystallinum or A. magnificum.Special Nutrient Note:
Anthuriums particularly love calcium and magnesium, which help support strong cell walls, root health, and overall vigor. These nutrients are often overlooked in basic fertilizers, so consider adding a Cal-Mag supplement once a month to round out their nutritional profile.
✅ Botanicare Cal-Mag Plus - A trusted go-to among tropical plant growers, especially when using RO or distilled water, which can lack essential minerals.Winter Pause:
Avoid fertilizing in the winter months when your anthurium naturally slows down. Feeding during dormancy can lead to salt buildup, root damage, or weak, leggy growth. Resume your regular fertilization schedule once spring returns and new leaves begin to emerge.
7. Common Problems & Solutions
Even with the best care, anthuriums can occasionally show signs of stress. Learning to spot early warning signs and knowing how to respond can make all the difference in keeping your plant healthy and thriving. Here are the most common issues anthurium growers face - and how to fix them:Brown Leaf Tips
Usually caused by low humidity, dry indoor air, or salt buildup from overfertilizing. If the air is dry (especially in winter), increase humidity using a humidifier or humidity tray. If you're fertilizing regularly, flush the soil every 1–2 months with plain water to wash out excess salts. Also check your water quality - tap water high in chlorine or fluoride can contribute to this issue.Yellow Leaves
Most often a sign of overwatering or inadequate light. Check if the soil is staying wet for too long—if so, reduce watering and make sure the pot has proper drainage. If the plant is sitting in a dim area, move it to a brighter spot with indirect light. Yellowing older leaves near the base are normal with age, but widespread yellowing should be addressed.No Blooms or Inflo
If your anthurium isn’t flowering or producing inflo, it may not be getting enough light or nutrients. Flowering varieties like Anthurium andraeanum need bright, indirect light and consistent feeding to produce their signature spathes. Try increasing light exposure and resume or adjust your fertilizing routine - especially using a bloom-supportive fertilizer during the growing season.Pest Issues
Common offenders include mealybugs, spider mites, and aphids, all of which can stunt growth or damage foliage. Inspect your plant regularly, especially the undersides of leaves and at stem joints. If pests are spotted, isolate the plant and treat using neem oil, insecticidal soap, or a rubbing alcohol/water mix. For persistent infestations, repeat treatments weekly and improve airflow around your plant to discourage future outbreaks.Proactive care - like wiping leaves clean, monitoring watering, and checking for pests - goes a long way in preventing problems before they start.
8. Propagation Methods
Anthuriums can be propagated through several methods, depending on the plant's maturity, your experience level, and the goal of the propagation (cloning, multiplying, or experimenting with hybrids). Each method has its own advantages and best-use scenarios.A. Division
One of the simplest and most beginner-friendly methods, division involves separating a mature plant that has produced pups (also known as offsets or side shoots). These smaller growths typically emerge from the base of the mother plant and develop their own root systems over time. Once the pup has a few healthy roots and at least one or two leaves, it can be gently separated—either by pulling or cutting it away with sterile shears—and potted into its own container.
This method ensures an exact genetic clone of the parent plant, making it ideal for preserving prized traits like rare variegation or leaf form. Division works best when repotting or refreshing the soil, as the root system is already exposed.B. Stem Cuttings
Another popular method is propagating through stem cuttings, especially with climbing anthurium species. Look for a visible node—a small bump or ring on the stem—accompanied by an aerial root. Using a clean, sharp tool, take a cutting that includes at least one node and preferably a healthy aerial root or growing eye.
You can root stem cuttings in sphagnum moss, a chunky aroid mix, or even perlite. High humidity (60–80%) and warmth will encourage faster rooting. Place the cutting in a clear container or humidity dome to maintain moisture and visibility. In a few weeks, new root growth should emerge, followed by a fresh leaf once it’s established.C. Tissue Culture (TC)
Tissue culture is an advanced propagation method where tiny pieces of plant tissue are grown in sterile, nutrient-rich media inside lab conditions. Many collectors buy Anthuriums in tissue culture—often still sealed in jars or small boxes—especially rarer hybrids or wild types that are difficult to find or afford in mature form.
When working with TC plants, acclimation is critical. These plants are extremely sensitive to changes in humidity, airflow, and light. Start by placing them in a high-humidity dome or enclosed container planted in a mixture of Fluval Stratum and fine perlite or a brownie plug and gradually increase ventilation over a period of days to weeks. Too much airflow too soon can dry out or kill the plant, while too little light may stall growth. Once the plant hardens off and begins pushing new growth, you can pot it into a standard mix and begin treating it like a mature seedling.
Tissue culture allows for mass production and disease-free propagation, but patience and a careful hand are essential for success.
9. Advanced Techniques
For enthusiasts looking to deepen their connection with anthuriums, techniques like hand pollination, hybridization, and seed germination offer a rewarding way to explore the full life cycle of these fascinating plants. Whether you’re trying to create your own unique cross or simply propagate from seed, these advanced methods require patience, attention to detail, and a bit of botanical curiosity.Pollination & Crossbreeding
Anthuriums produce an inflorescence made up of a spadix and spathe, and their flowers follow a unique sequential blooming pattern: the female phase comes first, followed by the male phase. To successfully pollinate, you’ll need two inflorescences at compatible stages.
Use a soft brush, cotton swab, or fine tweezers to collect pollen from the mature male phase (you’ll usually see white or yellow powder on the spadix). Gently dab the pollen onto the sticky surface of the female-phase spadix on another plant—or even the same one, in the case of self-pollination.
Label every cross carefully with parent names and dates. This is especially important when working with complex hybrids or trying to track traits like leaf shape, size, or variegation. After successful pollination, tiny berries will begin to swell on the spadix. Fruit development can take several months, often 4–6 months or more, before fully ripening into small, soft, berry-like structures that contain seeds.Seed Germination
Once the fruit is ripe (usually soft, plump, and easily removed), carefully extract the seeds, rinse away any pulp with clean water, and sow them immediately - anthurium seeds don’t store well and lose viability quickly. Place seeds on moist sphagnum moss, seed-starting mix, or a light aroid blend (see above), spacing them out so roots and leaves have room to grow.
Maintain high humidity (around 80%) and warmth (75–80°F / 24–27°C) using a propagation dome, ziplock container, or mini greenhouse setup. Good airflow is essential to prevent mold, but the environment should stay evenly humid and warm at all times. Germination typically occurs within 1–3 weeks, with small roots and cotyledons emerging first. Leaf development will follow soon after.
Growing anthuriums from seed is a slow but incredibly satisfying process. It can take several years for seedlings to mature and reveal their final form—but the possibility of discovering a brand-new phenotype or hybrid is part of the thrill.
10. Sourcing Supplies
Using the right supplies makes all the difference in the health and success of your anthuriums. Whether you're potting up a new plant, starting seeds, or acclimating tissue cultures, investing in quality materials ensures better growth, fewer setbacks, and a smoother overall experience. Below are some trusted sources for essential supplies—used and recommended by collectors and growers in the aroid community:
Orchid Bark - A key component of any chunky aroid mix, orchid bark provides structure and airflow to prevent root rot.Perlite - These lightweight additives improve drainage and prevent your mix from becoming compacted over time.Sphagnum Moss - Ideal for rooting stem cuttings, germinating seeds, or transitioning tissue culture plants. Choose long-fibered, clean moss for best results.Grow Lights and Humidifiers - Consistent lighting and ambient humidity are crucial for lush foliage and strong roots, especially in indoor setups.
Tissue Cultures – For adventurous growers, tissue culture plants offer access to rare hybrids and species at a more affordable price - just be ready to acclimate them slowly.
11. Conclusion
Anthuriums are more than just eye-catching tropical plants - they’re living works of art that can bring bold texture, color, and elegance to any indoor space. From velvety foliage to striking inflorescences, each variety offers its own unique charm. While they may seem a bit particular at first, these plants are surprisingly adaptable once you dial in their preferred conditions.
By providing the right balance of light, humidity, soil, and nutrition, and learning to respond to their signals, you’ll be well on your way to growing happy, healthy anthuriums. Whether you’re nurturing a single prized specimen or diving into advanced techniques like crossbreeding and tissue culture, there’s always more to discover with these fascinating members of the aroid family.
With a bit of patience, attention, and a touch of curiosity, anthuriums will reward you with lush growth, captivating foliage, and the satisfaction of mastering one of the plant world’s most stunning genera. Happy growing - and don’t be afraid to experiment, learn, and share your journey with the ever-growing community of anthurium lovers.
BONUS #1
Parts of an Anthurium
(Infographics)


Bonus #2Common Anthurium Terminology
Clone
An individual plant produced asexually—by division, tissue culture, or cuttings—so that its genetic makeup is identical to the “mother.” Cloning ensures that any desirable traits (variegation pattern, leaf shape, growth rate) are faithfully preserved.
Keep in mind that a clone is not the same as a “selfed” plant.
Offset
Also called a “pup,” an offset of the mother plant that forms at the base of the parent. In Anthuriums, once the offset develops its own roots, you can separate and pot it on its own to produce a new, genetically identical specimen.This is sometimes referred to as division.
× self (Selfed)
A cross in which pollen from a flower is used to fertilize the ovules of the same plant. Selfing in Anthuriums yields seed-grown offspring that tend to be more uniform than other sexual reproduction methods crossing other cultivars. Keep in mind that “selfed” seedlings do not always resemble the parent.
Blister Variegation
A rare type of variegation characterized by small, bubble-like patches of lighter tissue (often creamy white or pale yellow) on the leaf surface. In Anthuriums, these “blisters” result from somatic mutations that disrupt chlorophyll distribution in localized spots.
Filial Generations (F1, F2, F3, etc.)
Filial generations refer to the offspring produced through breeding, especially in controlled plant hybridization. Each generation is labeled with an “F” followed by a number, indicating its place in the lineage:F1 (First Filial Generation): The direct offspring from crossing two genetically distinct parent plants. F1 plants often show hybrid vigor - strong growth and desirable traits - but tend to be uniform.F2 (Second Filial Generation): Produced by selfing or interbreeding F1 plants. F2s show much more genetic variation, with a wide range of traits that may resemble either parent or a mix.F3, F4, F5, etc.: Each subsequent generation comes from selective breeding within the previous generation, often to stabilize specific traits like leaf shape, color, or growth habit. As filial numbers increase, plants generally become more genetically consistent but can lose hybrid vigor.In anthurium breeding, filial generations are crucial for tracking how traits are passed down and for selecting standout seedlings from a genetically diverse group.
Open-Pollinated
Seed produced when pollination occurs naturally (by insect, hand-rub, or wind) without controlled parentage. This can also be used when you may just be uncertain of the parents makeup or from an unknown hybrid. Offspring generally resembles the mother plant but can show wider variation since the pollen source is unknown.
Bench Hybrid
A deliberate, controlled cross made by a breeder—usually on a greenhouse “bench.” Pollen is hand-transferred from one selected parent to another to combine specific traits, then seeds are harvested and grown out. “Bench” is often used when the sexual crossing of the anthurium is not done in a controlled environment but is done in a greenhouse or “bench” where other pollen could possibly be involved as well.
NOID
Short for “no identification” or “NO ID”. A plant (or seedling) lacking a registered name or known lineage. Among Anthurium hobbyists, NOIDs may be unnamed seedlings or sports awaiting classification, lost tags or a multitude of other reasons.
Ecotype
A naturally occurring population of a species adapted to a particular locale or microclimate. Different Anthurium ecotypes (e.g., from Costa Rica vs. Ecuador) may show distinct leaf shapes, sizes, or tolerances can also be referred to as a “subspecies”.
Germination
The process by which a seed resumes growth and sprouts into a seedling. For Anthuriums, optimal germination often requires warm temperatures (75–85 °F), high humidity, and a fine, well-draining seed medium.
Community Pot
A single container in which many seedlings (often from the same cross) are grown together. In Anthuriums, community pots encourage upright growth and can be pricked out later—plus they look lush and full while you’re evaluating seedlings. ~Note: Do your sanity a favor and separate the seedlings before the roots become too intertwined.
Cataphyll Growth (“in cataphyll”)
Cataphylls are the papery sheath-leaves that enclose and protect a developing leaf or inflorescence. When you see new growth “in cataphyll,” it means the emerging leaf or spike is still partly wrapped in its protective covering.
Inflorescence (“inflo”)
The reproductive structure of an anthurium., composed of a usually colorful spathe (a modified leaf) surrounding a spadix (the central stalk bearing tiny true flowers). Growers often abbreviate it as “inflo.”
Spadix
The spadix is the central, finger-like spike found at the center of the spathe. It’s actually a dense cluster of tiny true flowers, arranged along the spike. Anthurium flowers bloom in phases - female first, then male - which is why understanding the spadix is key for successful hand pollination and hybridization.
Aerial Root
An aerial root is a root that grows above the soil line, typically along the stem or at nodes. In the wild, these roots help anthuriums anchor themselves to trees and absorb moisture and nutrients from the humid air. Indoors, aerial roots often signal a healthy, actively growing plant and can assist in propagation when included in cuttings.
Variegation
Variegation refers to irregular patches or patterns of color on a leaf - often white, cream, yellow, or pink - caused by the absence or reduction of chlorophyll in certain areas. While beautiful and often highly sought-after, variegated anthuriums generally require brighter light to maintain their coloring, as they have less surface area for photosynthesis.
Node
A node is a small, slightly raised or ringed area on the stem where leaves, roots, or new growth can emerge. Nodes are essential in propagation—any successful cutting must include at least one node, as it’s the growth point that generates new roots and shoots. Without a node, a cutting cannot develop into a new plant.
Bonus #3
Common Anthurium Naming Nomenclature & DefinitionsDF
Dewey Fisk (collector/source) and also used to mean “Dark Form” or “Delta Force”
sp. nov “DF”
Literally “species nova Dewey Fisk” – a temporary placeholder for an undescribed new species collected by Dewey Fisk.
papillilaminum FS or just FS
“Fort Sherman” – a classic wild‐collected A. papillilaminum clone from Jay Vannini’s Fort Sherman site.
papillilaminum RL or just RL
“Ralph Lynam” pap clone; a wild A. papillilaminum clone introduced by Jay Vannini.
RL
Ralph Lynam pap clone (from Jay Vannini)
RLFS, FSRL, RL × FS, FS × RL
Any combination of RL and FS denotes the cross between the Ralph Lynam and Fort Sherman clones (RL × FS = RL seed parent × FS pollen parent; FS × RL vice versa).
RC
“Red Crystallinum” or just “Red Crystal” – a red‐veined form of A. crystallinum.
AOS
“Ace of Spades” – a dark, spade-shaped hybrid of uncertain parentage.
DP
“Dark Phoenix” – an A. papillilaminum × A. dressleri hybrid originally from Indonesia.
CP
“Circus Peanuts” – a dressleri × leucostachyum hybrid nicknamed for its candy-sweet inflorescence odor.
FTG (FTG crystallinum)
A crystallinum hybrid originating from Fairchild Tropical Gardens.
NSE
Plants grown by NSE Tropicals (Enid Offolter’s Florida nursery).
SKG
Plants grown by Silver Krome Gardens in Florida.
Tezula
Plants grown by Tezula Plants in Florida.
KOS or HU
“King of Spades” or “Haji Uli” – an Indonesian hybrid by breeder Haji Uli, sometimes notated just as (HU) as well.
TALL
“Tim Anderson Long Leaf” – a long-leaf hybrid introduced by Tim Anderson, often in TALL “A” and TALL “B” forms.
papillilaminum L × LB or just LB
“Long × Long Bullet” – a form of papillilaminum with especially elongated leaves.
Novelty Ace or Novelty AOS
A plant sold by @noveltyg on eBay as “Ace of Spades” - not a true AOS but similar in appearance.
RA1, RA2, RA3…
Numbered wild papillilaminum clones sold by Rory Antolak (“RA”).
RA
Any plant sourced or sold by Rory Antolak (source of many wild-collected clones)
Dressleri RG
“Río Guanche” – an ecotype of A. dressleri from Río Guanche, Panama, prized for its near-black leaves.
Indo dressleri
A NOID (no-ID) anthurium from Indonesia sold under the name dressleri - NOT true A. dressleri.
“Windy” dressleri
A form of A. dressleri grown by Windy Aubrey, likely derived from the RG clone but sold under her name.
OG1, OG2, OG3…
Wild A. carlablackiae clones numbered by Scott Cohen (originally sourced from Rory Antolak).
SC1, SC2, SC3…
Numbered papillilaminum clones sold by Scott Cohen (“SC”).
Wu1, Wu2, Wu3…
Select lines of various species (e.g. crystallinum, papillilaminum, carlablackiae) produced by Wuhoo Tropicals in Texas.
GPH
Juan (aka @GayPlantHeaux) personal cataloguing notation for his clone codes for his A. carlablackiae mother plants - most famously GPH001
KOC
“King of Clarinervium,” an unnamed Indonesian A. clarinervium hybrid or sport
JV
Jay Vannini - CA grower/breeder renowned for line-breeding A. dressleri (Rio Guanche ecotype)
PM
Paul Marcellini from Understory Oasis (South Florida); especially known for his A. kunayalense lines
RF
Round × Felix F₁ cross - a family of hold-backs/breeding lines (e.g. RF1, RF2)
RVDP
“Red Vein Dark Phoenix,” a Thailand hybrid similar ro the Dark Phoenix but with red venation
BVEP
Black Velvet Eastern Panama (now A. antolakii)
RG
Río Guanche ecotype of A. dressleri (aka Ree Gardens)
The Ultimate Alocasia Guide:

How to Grow, Propagate, and Understand These Beautiful Drama Queens

🌿
Alocasia are the divas of the plant world - stunning, moody, sensitive, and absolutely worth the effort. Whether you’re a seasoned collector or a new plant parent who has fallen in love with those dramatic arrow-shaped leaves, Alocasia offer endless fascination. They can be incredibly rewarding once you understand what they’re trying to tell you.
Known for their bold veins, velvety leaves, striking textures, and sometimes massive jungle-vibes, they are truly living art pieces. But behind that beauty lies a plant shaped by the rainforest: a plant that demands consistency, humidity, bright filtered light, and, above all, patience. This guide will help you understand not only how to care for Alocasia, but why they behave the way they do — and how to help your collection thrive.
🌱 Understanding the Alocasia 🌱
Origins & Natural Habitat
Alocasia are native to Southeast Asia, Eastern Australia, and tropical island forests. Their natural environment is hot, humid, and full of filtered, dappled light under the rainforest canopy. The forest floor is moist but never swampy, and the seasons alternate between monsoon rainfall and drier periods.Understanding this helps explain nearly all of their care needs:
They love humidity.
They hate cold drafts.
They want bright light - but not harsh direct midday sun.
They grow actively in warm seasons and slow down or go dormant during cooler months.
Anatomy & What Makes Them Unique
Alocasia have some features that make them different from other aroids:
Corms: These underground storage organs hold energy, similar to bulbs. They allow Alocasia to drop leaves during stress and regrow later.
Petioles: Long stems that support those iconic leaves.
Veins: Often silver, white, neon green, or deeply etched depending on the species.
Runners/Pups: Many species produce small “baby” plants — pups — from corm offsets.
Common Collector Species
There are over 90 species and countless hybrids. A few popular ones include:
Alocasia Amazonica (Polly) – striking, high-contrast veinsAlocasia Frydek – velvety, deep green with light neon veinsAlocasia Silver Dragon / Dragon Scale – textured, reptile-like leavesAlocasia Cuprea – metallic, reflective sheenAlocasia Melo – thick, almost stone-like textured leavesGiant varieties like Portora and Macrorrhiza can grow enormous outdoorsRare collectors often hunt down unique hybrids and uncommon morphology types — from dark-veined forms to highly textured varieties.
💡Alocasia Care Requirements💡Caring for Alocasia comes down to mastering consistency. When you meet their needs, they reward you with explosive growth.☀️Light Requirements for Alocasia☀️
If humidity is the heart of Alocasia care, light is definitely the lungs. These plants evolved under the dappled, filtered canopy of tropical forests, where sunlight is bright but rarely direct. That natural environment tells us almost everything we need to know about how to keep them happy indoors.
Alocasia Prefer Bright, Indirect Light Here’s Why
In the wild, Alocasia grow beneath tall trees that buffer harsh rays, allowing only softened sunlight to reach the forest floor. Their leaves are built for gathering a lot of light energy, but not for taking the full brunt of midday sun.When the light level is right, you’ll see:
Strong, sturdy petioles
Bold, defined venation
Steady growth and new leaves unfurling.
Healthy, vibrant colorationWhen the light is wrong, Alocasia will tell you fast — often long before other plants complain.🌧️What Happens in Too-Low Light🌧️
Alocasia often look “sad” in low light, and show it in predictable ways:
1. Leaf Yellowing
Not to be confused with overwatering — yellowing can also come from insufficient photosynthesis. When the plant can’t make enough energy, it begins sacrificing older leaves to conserve resources.
2. Leggy, Stretched Petioles
Instead of compact leaves, you’ll see:
Long stems
Leaves reaching toward the nearest window
Drooping or weak stems
This stretching is a survival move — the plant is literally searching for sunlight.
3. Pest Vulnerability
Alocasia in low light attract pests like spider mites more easily. A stressed plant produces less natural defense compounds, making it an easy target.🔆What Happens in Too-Harsh Light🔆
Direct sun, especially from the afternoon west-facing windows, can scorch those dramatic leaves.
Signs include:
Crispy brown edges
Faded patches
Bleached or pale coloration
Sudden limpness from heat stressEven “sun-tolerant” varieties like Portora or Odora can burn indoors when pressed against hot glass.
Tip: If your Alocasia gets direct sun for more than 45 minutes a day, consider filtering it with a sheer curtain.🌤️Best Indoor Light Locations🌤️
1. East-Facing Windows (Ideal Spot)
Gentle morning sun
Bright light the rest of the day
Low risk of burningPerfect for nearly all Alocasia species, especially velvety types like Frydek or Black Velvet.2. North-Facing Windows
Great for:
Smaller species
Plants sensitive to strong sun.
Homes with naturally bright ambient light.North windows often pair well with a grow light during winter.3. A Few Feet from a Bright South or West Window
Distance is your friend here.
Place Alocasia 3–6 feet away to avoid direct rays.
West windows can be intense, so more distance or a sheer curtain helps.
South windows offer excellent year-round brightness if you avoid direct exposure.This is the sweet spot for:
Dragon Scale
Melo
Cuprea
Imperial giants like Macrorrhiza4. Under Grow Lights (Their Absolute Favorite)
Alocasia respond incredibly well to grow lights.
Benefits:
Consistent brightness
Strong, compact growth
Faster leaf production
Reduced pest risk
Predictable growth cyclesGrow light tips:
Keep the light 12–18 inches above the plant.
Run for 10–12 hours per day.
Avoid harsh or hot bulbs.
Full-spectrum LED is best.Grow lights are especially useful during:
Winter
Dormancy recovery
Propagation🚫Locations to Avoid🚫
1. Full Afternoon Sun
This is the strongest, hottest sunlight of the day.
It can burn delicate Alocasia leaves within hours.If all you have is a west-facing window:
Use a sheer curtain.
Move the plant back several feet.
Rotate regularly to avoid one-sided growth.2. Corners Far From Windows
These are “plant dead zones.”Symptoms:
Very slow growth.
Thin leaves.
Sudden dormancy.
Increased spider mites.Alocasia are not low-light plants — and they’ll tell you quickly when they’re unhappy.📘The “Book Test”📘
Perfect Placement
A simple, almost "foolproof" method:
If you can comfortably read a book without turning on a lamp,
your Alocasia can thrive there.This works because:
Human eyes adjust easily, but reading-level brightness indicates sufficient PAR (photosynthetically active radiation).It’s a good rule of thumb when exact light measurements aren’t practical or available.Even better: use the book test and place your hand between the plant and the light source.
If it casts a soft, blurry shadow→ good light.
If the shadow is very faint → too dim.
If the shadow is sharp and defined → too strong.
💧Watering & Moisture for Alocasia💧
Watering is the part of Alocasia care that scares most people — and for good reason. These plants are moisture-loving but extremely sensitive to the wrong kind of moisture. Understanding how their corms and roots work will help you water confidently instead of nervously guessing.
Alocasia evolved in tropical forests where soil stays moist, airy, and well-draining. They’re used to frequent rain, rapid drainage, and constant airflow. When we recreate these conditions indoors, they respond with strong roots, fast growth, and happy leaves. When we don’t… they yell at us.Let’s break it down!
🌱How Alocasia Roots and Corms Handle Water🌱
Alocasia grow from corms, which act like tiny storage batteries. These corms hold water, energy, and nutrients, helping the plant survive during:
Seasonal dryness
Temperature drops
Stress
DormancyBecause corms store water, Alocasia do not want soggy soil around them.Too much water suffocates the corm, leading to:
Rot
Pests
Collapse of petioles
Sudden dormancyBut on the flip side…
Alocasia roots are extremely thin and fast-growing, and they hate drying out too much.
Repeated dehydration weakens them, causing:
Limp leaves
Curling
Slow growth
Smaller corms
Pests (especially spider mites)So the mission is a moist but breathable root zone.💧How to Water Alocasia Properly💧
1. The “Top 1-2 Inch Test”
Let the top inch or two of soil dry before watering again.
Stick your finger in the soil
If the surface is dry but the lower soil still feels cool or damp → it’s the perfect time
If the top 2 inches are dry and the pot feels light → water soon
This prevents waterlogging while keeping the main root zone moist.2. Water Deeply - Don’t Dribble
When you water, water thoroughly until it comes out of the drainage hole.Why this matters:
Deep watering encourages deep root growth.
Shallow, frequent watering creates weak roots.
Deep watering flushes out fertilizer salts.After watering:
Let the pot drain fully
Never leave the plant sitting in water for an extended timeframe3. Adjust Watering by Season
Growing Season (Spring + Summer + Early Fall)
Water more frequently — the plant is drinkingSoil may dry out quickly because of heat, growth, and transpirationLeaves may droop slightly right before watering timeDormant Season (Late Fall + Winter)
This is where most people overwater.Signs your Alocasia is entering dormancy:
Slowed growth
Smaller leaves
Petioles leaning or relaxing
Soil staying wet longerDuring dormancy:
Let it dry more between waterings.
Water only when the pot is noticeably lighter.
Don’t try to “force” growth with extra water.
Reduce humidity swings.A dormant Alocasia may lose most of its leaves — this is normal.
As long as the corm is firm, it will regrow when conditions improve.💦Signs You’re Overwatering💦
Overwatering is the most common Alocasia problem.
Symptoms:
Yellow lower leaves.
Soft or mushy stems near the base.
Mushy or dark corms.
The soil smells sour or “swampy”.
Fungus gnats everywhere.
Persistent soil wetness.If this happens:
Remove the plant from its pot.
Inspect the corm for rot (black, mushy sections).
Trim damaged roots.
Repot in a chunkier mix.
Increase airflow.This rescue works often - their corms are surprisingly resilient!!!🔥Signs You’re Underwatering🔥
Underwatering is less common, but Alocasia hate it, too.
Symptoms:
Dramatic drooping.
Curling or folding leaves.
Crispy edges.
Soil pulling away from the pot.
Small, misshapen new leaves.
Slowed or halted growth.If you underwater repeatedly:
The corm shrinks.
Root hairs die off.
Pest pressure increases.
Dormancy may start prematurely.To fix:
Water deeply and slowly to rehydrate the root ball.
Consider bottom watering occasionally (we do this as a normal way of watering).
Add more organic matter for moisture retention.🌧️How to Fine-Tune Watering Based on Environment🌧️1. Humidity Level
Low humidity → soil dries faster
High humidity → soil stays moist longer
If your home is 30% humidity:
Water more frequently.
Use a humidity tray or humidifier.If your humidity is 60–70%:
You can stretch watering intervals2. Pot Type
Alocasia react very differently depending on the pot.Plastic pots:
Retain moisture longer.
Great for warm homes.
Can cause rot if you tend to overwater.Terracotta pots:
Dry out quickly.
Best for chronic over-waterers.
Good airflow for roots.Ceramic (glazed):
Moderate moisture retention.
Watch for clogged drainage holes.3. Soil Type
Chunky, airy soil = less risk of overwatering
Peaty, dense soil = danger zoneIf your plant is in dense soil:
Mix in perlite, bark, and pumice immediately.
You’ll water less often AND avoid rot.4. Temperature
Warm temperatures = fast evaporation
Cool temperatures = slow evaporationIf your Alocasia is near:
A heater → water more
An AC vent → water less
A draft → watch for pseudo-dormancy🌿How Often Should You Water?🌿
There is no universal schedule - but here are averages:
Spring/Summer: every 5–7 days
Fall: every 7–10 days
Winter: every 10–21 days depending on dormancy.
Let the plant guide you, not the calendar.🌊Watering Tips for Extra-Healthy Alocasia🌊
Use room-temperature water - cold water shocks roots.
Add beneficial bacteria occasionally.(like Hydroguard or EM-1).
Bottom water once a month to hydrate dry pockets.
Flush your pot every 4–6 weeks to remove salt buildup.Add a moisture meter ONLY if you understand its limitations (topsoil dries faster than deeper layers).✔️The Watering “Golden Rule”✔️
Moist but not soggy - and never bone-dry.Your Alocasia should live in a Goldilocks zone where:
The top dries light and fast.
The bottom remains aerated and moist.
The corm stays firm and rot-free.
When you nail this balance, you’ll see larger leaves, steady growth, fewer pests, and a noticeably happier plant overall!!
🌱Soil & Potting Mix for Alocasia🌱
Alocasia are particular about their soil because their roots and corms are built for fast drainage, high airflow, and consistent moisture. Think of their ideal substrate as a tropical forest floor: loose, airy, organic, full of decaying plant matter - never dense, heavy, or compacted. When you recreate those conditions indoors, your Alocasia grow faster, root healthier, pup more readily, and experience fewer issues with rot or pests.
This section will help you create the perfect Alocasia soil mix — and understand the science behind each component.🌿Why Soil Matters So Much for Alocasia🌿
Unlike many houseplants, Alocasia have:
Thin, delicate feeder roots that need oxygen.
Corms that can rot if smothered.
Fast-growing root systems during active season.
High transpiration rates that require steady moisture.
Dormancy cycles that make good drainage essentialIf the soil is too dense, roots suffocate.
If the soil dries to dust, roots shrivel.
If the soil stays wet, the corm rots.
So the goal is a moisture-retentive but airy medium - a balance many store-bought soils can’t provide on their own.🍃The Ideal Soil Characteristics🍃
Your Alocasia’s potting mix should be:
1. Well-Draining
Water should flow through the pot freely, preventing soggy pockets that suffocate roots.
2. Aerated (Lots of Oxygen)
Airflow prevents rot and encourages strong root growth.
3. Moisture-Retentive
Just enough water retention to avoid the soil drying out too quickly - especially important for those thin feeder roots.
4. Chunky & Textured
Large particles mimic the forest floor and protect the corm from compaction.
5. Nutrient-Rich
Alocasia are fairly heavy feeders and appreciate organic matter.
No single ingredient checks all these boxes — which is why a multi-component aroid mix is the gold standard.🪴The Perfect Alocasia Soil Mix Recipe (in our opinion)🪴
Here is the most reliable, well-balanced mix for Alocasia:
⭐BeLeafinRudolph’s Recommended Aroid Mix⭐
30% chunky perlite (airflow + drainage)
30% orchid bark mulch (structure + aeration)
25% coco coir or sphagnum moss (even moisture retention)
5% earthworm castings (nutrients + beneficial microbes)
10% horticultural charcoalThis creates the perfect trifecta:
Air pockets for breathability.
Chunky texture that prevents compaction.
Fine material that keeps the mix evenly moist.⚠️Ingredients to Avoid in Alocasia Soil⚠️
Avoid soil mixes with:
High peat content (holds too much water, compacts quickly).
Clay or heavy organic soils.
Miracle-Gro-type moisture control mixes (terrible for corms).
Sand (makes soil heavier and suffocates roots).
Garden soil (bacteria, pests, compaction).If your soil looks like mud when wet → repot ASAP.
🌬️Why Aeration Is Critical: Root & Corm Physiology🌬️
Alocasia roots are extremely oxygen-hungry.
Without airflow:
They stop absorbing nutrients.
They soften and rot.
Dead roots attract fungus and gnats.
The corm becomes vulnerable.A chunky mix prevents this by:
Elevating the corm.
Providing airflow channels.
Encouraging faster drying between waterings.Think of it like this:
Dense soil drowns the plant. Chunky soil lets it breathe.
🪨Potting Mix Adjustments Based on Environment🪨
Your mix should change depending on your home conditions:
If your home is dry (20–40% humidity):
Add more sphagnum or coco.If you frequently overwater:
Increase perlite or pumice.If the plant is in a hot, bright grow-light setup:
Add more bark and coir - they’ll drink faster.If the plant is entering dormancy:
Use a faster-drying mix (only if needed) and water less often🪴Soil for Alocasia Pups and Corm Propagation🪴
Corms and pups benefit from slightly different textures than mature plants.For pups (if transferring from corm substrate medium):
33.3% fluvial stratum
33.3% perlite
33.3% coco coir or fine chopped moss
This supports fragile new root systems.For corms:
(Our preferred method)
50% Fine Perlite
50% Fluval Stratum
In a well draining self watering cup.Or
Moist sphagnum moss
(a shallow bed of moist moss)Or
Puddle method
(just enough water in a shallow cup to keep the corms moist)🔄How Often Should You Repot Alocasia?🔄
General rule:
Every 12–18 months for active growers.
Every 18–24 months for slow growers.Repot when:
Roots circle the bottom.
Soil becomes compact.
The plant is producing lots of pups.
Water drains too slowly.
It dries out in 2 days or less.
Best repotting season: spring or early summer.🌟The Gold Standard Test for Good Alocasia Soil🌟
A perfect mix will:
Wet thoroughly when watered.
Drain quickly within seconds.
Feel fluffy even when damp.
Smell earthy (not sour).
Hold moisture for 3–7 days depending on climate.
Support plump, firm corms and white roots.If your soil passes all these tests, your Alocasia will reward you with lush, steady growth.
💦Humidity for Alocasia💦
Humidity is one of the most misunderstood yet most important factors in Alocasia care. These plants evolved in lush tropical forests where the air is thick with moisture - often between 70% and 90% humidity. While we can’t realistically recreate jungle air indoors, we can give them the stable, elevated humidity they need to grow strong leaves, resist pests, and avoid the dramatic tantrums they’re famous for.
Alocasia can survive in average home humidity.
But they absolutely thrive in higher humidity.
Let’s dig into the science, the practical tips, and the environmental cues that will help your Alocasia stay consistently happy.🌤️Why Alocasia Love Humidity🌤️
Alocasia are native to environments where:
The air is continually damp.
Rainfall is frequent.
Surrounding vegetation traps moisture.
Evaporation is slow.
Morning dew forms regularly.As a result, their leaf and stomatal structure adapted to exchange water vapor constantly with the air around them.When humidity is high:
Leaves stay plump and healthy.
Stomata function properly.
Growth is steady.
New leaves unfurl more easily.
Pests struggle to reproduce.When humidity is low:
The plant loses moisture faster than it can replace it.
The edges brown.
The leaves curl.
Growth slows.
Spider mites sneak in (their #1 opportunity).Humidity isn’t optional - it’s a core part of Alocasia physiology.📊Ideal Humidity Range for Alocasia📊
Here’s a simple breakdown:
70 - 80% → Ideal “thriving” range. Explosive growth.
60 - 70% → Very good. Healthy leaves and steady growth.
50–60% → Acceptable for most species. Monitor for mites.
Below 40% → Risk zone. Leaves crisp. Mites appear. Growth stalls.Velvety or delicate species (Frydek, Black Velvet, Silver Dragon) appreciate humidity above 60% the most.
Thicker or waxier varieties (Regal Shield, Portora, Odora) can tolerate slightly lower humidity.🌫️How Humidity Interacts with Light & Temperature🌫️
Humidity isn’t just a standalone factor - it works in synergy with the environment.
1. Higher Light = More Transpiration
Under bright grow lights or near windows:
Alocasia use more water.
Leaves evaporate moisture faster.
→ You’ll need either more humidity or more frequent watering.2. Higher Temperature = Faster Drying
Warm air dries soil and leaves quickly.3. Cold Air = Shock + Dormancy
Cold + low humidity is a double stressor.4. Low Humidity = Pest Invitation
Spider mites thrive in dry, warm air.
Alocasia do not.🧪Visible Signs of Low Humidity🧪
Low humidity symptoms are easy to spot:
Brown edges or crispy tips.
Curling leaves.
Premature leaf aging.
Wilting even when watered.
New leaves emerge smaller.
Unfurling deformities (“stuck” leaves).
Increased spider mites.
A dull or faded leaf surface.If you’re seeing more than two of these at once, humidity is likely the culprit.💧Visible Signs of Ideal Humidity💧
When humidity is just right:
Leaves remain glossy or velvety.
New growth unfurls cleanly.
Leaves stay firm and plump.
No crisping on the edges.
Root systems expand quickly.
The plant may produce pups more often.
You’ll also see bigger leaves and a calmer, more predictable growth pattern.🧴Humidity Boosting Methods That Actually Work🧴
Not all humidifying strategies are equal. Let’s go through the best ones.
⭐1. Humidifiers (The Gold Standard)
A good humidifier is the most effective and reliable method.
Tips:
Choose one with a built-in hygrometer.
Use distilled water to avoid white dust.
Run it near the plants, not across the room.
Ideal runtime: 8–12 hours/day
Clean weekly to prevent bacteria.
This can raise humidity by 15–30% in your plant zone.2. Grouping Plants Together
Plants release moisture through transpiration.
When grouped:
They create a small microclimate.
The air remains more humid.
Best for shelves or windowsills.
This is a great method when you don’t want a humidifier running.3. Pebble Trays
These provide very modest humidity, but every bit helps.
Key rules:
Water should NOT touch the pot.
Tray must remain mostly full.
Works best in small, enclosed spaces.
This raises humidity 3–7% on average.4. Glass Cabinets / Greenhouse Cabinets
For your more bougie babies
IKEA greenhouse cabinets.
Propagation boxes.
Terrariums.
These allow for:
70–90% humidity.
Warm, stable environments.
Reduced pests.
Velvety alocasia and rare hybrids thrive in these setups.5. Bathrooms With Bright Light
Natural humidity spikes from showers can be amazing if your bathroom has:
A bright window.
A skylight.
Or a grow light setup.
(Dry bathrooms don’t count, though.)❌Methods That Don’t Really Work❌
(But People Think They Do)
1. Misting Leaves
Harsh truth: Misting does almost nothing for humidity.
Moisture evaporates in minutes and can:
Cause spotting.
Encourage fungus.
Spread pests.
Great for photos, bad for actual humidity.2. Bowls of Water Nearby
A bowl of water is charming — but negligible.
Raises humidity maybe 1–2%.🧩Matching Humidity Levels to Specific Alocasia Species🧩
Velvety & Delicate (Need Higher Humidity)
Frydek
Black Velvet
Silver Dragon
Dragon Scale
Melo
Cuprea
These do best at 60–70%+, more if possible.Thicker or More Rugged Species
Regal Shield
Odora
Macrorrhiza
Portora
Yucatan Princess
These tolerate 50–60%, but still prefer higher.Collector Hybrids
Many hybrids express traits from delicate parents - aim for 70% for best results.🌡️Humidity and Dormancy🌡️
Humidity needs change during dormancy:
During active growth:
Maintain 55–75%
Keep consistent airflow
Avoid big humidity swingsDuring dormancy:
You can lower humidity slightly
But avoid extremely dry conditions (under 35%).High humidity + cold = rot risksDormant Alocasia want:
Warmth
Light
Stability more than high humidity🔥The Secret to Alocasia Success🔥
You don’t need rainforest-level humidity.
You just need consistent humidity.Alocasia hate:
Sudden drops
Dry, heated winter air
Hot/cold drafts
Drastic fluctuationsIf humidity can stay between 50 - 70% most days, your Alocasia will reward you with big, beautiful leaves and far fewer issues.
🌾Fertilizing Alocasia🌾
Fertilizing Alocasia is less about “feeding the plant” and more about supporting its fast metabolism and high energy demands during active growth. These plants build large leaves, maintain complex root systems, power multiple corms, and often produce pups — which means they burn through nutrients quickly in the growing season.
But at the same time, Alocasia can be sensitive to excess salts or over-fertilizing, especially when light or humidity is low. Getting fertilization right is all about timing, dosage, and consistency.
Let’s break down everything your readers need to know.🌱How Alocasia Use Nutrients🌱
Alocasia need nutrients for:
Rapid leaf production.
Strong root development.
Thick petioles.
Healthy chlorophyll levels.
Growing or multiplying corms.
Pushing out pups.
Recovering from dormancy.
Because they naturally grow in nutrient-rich, decaying organic soil on the forest floor, they expect access to a steady stream of minerals - but not in giant chemical bursts like some houseplants can handle.
Balanced, consistent fertilizing = Happy Alocasia!!!🌤️When to Fertilize Alocasia🌤️
Think of fertilizing in terms of energy cycles, not the calendar.
⭐Growing Season⭐
(Spring → Early Fall) - YES, Fertilize
This is when the plant:
Is actively producing leaves.
Is pumping water through its stems.
Is photosynthesizing at max capacity.
During this period, regular fertilization
=
bigger, stronger, more frequent leaves.(Late Fall + Winter) - PUMP THE BRAKES
Your Alocasia slows growth or enters dormancy:
Reduce fertilizer drastically or stop entirely until new growth begins.
Why?
Dormant or semi-dormant plants can’t process nutrients effectively.Fertilizing at the wrong time can cause:
Salt buildup
Root burn
Yellowing leaves
Stunted growth
Rot in cold, wet soilTiming is everything.🧪The Three Main Fertilizer Types for Alocasia🧪
Alocasia respond well to three main categories. Each has pros and cons.🌿1. Liquid or Liquid Soluable Fertilizer🌿
(Most Popular for Indoors)
Liquid fertilizers are easy to control, gentle and ideal for consistent dosing.
Recommended Brands:
Fertilizers:
Our 2 recommended brands are Tezula MSU 13-3-15 and GT Foliage Focus (make sure to dilute according to packaging)Other Nutrients/ Addatives:
Cal/Mag - Botanicare Cal-Mag Plus or TPS NUTRIENTS Organic Cal-Mag OACSilica - TPS NUTRIENTS Silica Gold or Bloom City Liquid SilicaRoot Stimulator - Great White Mycorrhizal Fungi or Trifecta Myco SupremeBonus tip:
If using grow lights, you may fertilize slightly more often because the plant is able to process more food.🌿2. Slow-Release Fertilizers🌿
(Set-It-and-Forget-It Style)
Examples:
Osmocote Plus
Tezula Plants Florikan 16-5-11 NPK MAX 180 DayPros:
Very gentle.
Releases nutrients gradually over 3 - 4 months.
Hard to “overdo it”.
Great for busy plant parents.
Excellent for outdoor pots.How to use:
Mix into the top 1–2 inches of soil.
Use more lightly for plants in lower light.
This method mimics natural, slow decomposition on the forest floor.🌿3. Organic Fertilizers (Aroid-Friendly Superfoods)🌿
Organic options:
Worm castings
Fish emulsion
Kelp extract
Compost teasOrganic fertilizers support:
Beneficial microbes
Root health
Long-term soil quality⭐Worm castings (the MVP)⭐:
Won’t burn roots
Adds micronutrients
Improves moisture retention
Keeps soil fluffy and aerated
Especially good for young Alocasia, pups, and delicate species.
Use 10-20% mixed into your soil or a small top-dress layer.Kelp extract:
Contains growth hormones (cytokinins) that encourage:
Larger leaves.
Faster recovery from stress.
Better root branching.
Use sparingly - once a month or every 6 weeks.Fish emulsion:
Very powerful → dilute well
Use only outdoors or in well-ventilated areas due to smell.🌈Choosing the Best Fertilizer for Your Setup🌈
If you grow under bright grow lights:
Use liquid fertilizer regularly because the plant is more active.If you forget to fertilize often:
Use Osmocote or another slow-release formula.If you want lush, organic growth:
Combine liquid fertilizer + worm castings + occasional kelp.If your plant is recovering from root rot or dormancy:
Use gentler organics first → then introduce liquid feeding later.🍃How to Tell if Your Alocasia Needs More Fertilizer🍃
Signs of insufficient nutrients:
Pale or washed-out leaves.
Slow growth during growing season.
Smaller-than-normal new leaves.
Yellowing between veins (chlorosis).
Weak, thin petioles.
Soil that looks depleted or heavily broken down.Alocasia are especially quick to show magnesium and iron deficiencies, often presenting as:
Pale, light green new leaves.
Faded color.
Poor venation contrast.
A gentle dose of liquid fertilizer with micronutrients usually fixes this quickly.⚠️How to Tell If You’re Over-Fertilizing⚠️
Over-fertilizing is more common than people realize, especially in winter.
Signs include:
Brown, burnt leaf edges.
Crispy tips.
Soil with white crust (salt buildup).
Drooping despite being watered correctly.
Dark, soggy soil.
Leaf deformities on new growth.If you see any of these:
Flush soil thoroughly with plain water.
Pause fertilizing for 4–6 weeks.
Check humidity and light.
Ensure the soil is chunky and airy.Never fertilize a thirsty plant - always water first, then fertilize on damp soil.🔁A Simple, Foolproof Fertilizer Routine🔁
Spring → Early Fall (Active Growth)
Liquid fertilizer every 2–3 weeks (½ strength)
OR
Osmocote every 3 months
+
Add worm castings at the start of the season
Optional: kelp extract every 4–6 weeksLate Fall + Winter
Fertilize only if plant is still actively growing (e.g., under grow lights).
Otherwise, hold off entirely.
Resume lightly once new growth appears.Post-Dormancy (When First New Leaf Appears):
Start with worm castings or a very diluted liquid feedIncrease feeding gradually over 4 - 6 weeks🌟The Golden Rule of Fertilizing Alocasia🌟
Feed consistently - never heavily.
Alocasia thrive under steady, gentle nutrition.
They struggle with big doses or inconsistent feeding schedules.
If you keep the nutrients flowing softly and regularly, your Alocasia will reward you with:
Larger leaves.
Stronger corms.
Faster pup production.
Deeper color.
More resilient growth overall.
🌡️Temperature & Seasonal Care for Alocasia🌡️
Temperature is one of the most powerful environmental cues for Alocasia. These plants evolved in consistently warm, humid jungles where temperatures rarely drop below the mid-60s. They thrive on warmth and stability - and they react dramatically when conditions shift. Understanding how temperature influences growth, dormancy, and overall health is key to keeping your Alocasia happy year-round.
If you’ve ever wondered why your Alocasia suddenly slowed down, dropped leaves, or sprung back to life seemingly overnight… temperature was probably the reason.🌞The Ideal Temperature Range for Alocasia🌞
Alocasia prefer a warm, stable environment that mimics their tropical origins.
Optimal temperature range:
70 - 85°F (21–29°C) — This is their sweet spot.
Growth is fast.
Leaves are large.
Roots stay active.
Pups form more readily.Safe minimum limit:
60°F (15°C) — Below this, things get dicey.Getting Dicey:
55–60°F:
Growth slows significantly
Water uptake decreases
The plant may initiate dormancy
Leaves can droop or curlDanger zone:
Below 50°F (10°C)
Just a few hours in this zone can trigger:
Complete leaf drop.
Corm shock.
Rot (because the plant stops drinking).
Full dormancy.
Indoor growers in cooler climates need to be especially mindful during winter.
🎐Why Alocasia Hate Temperature Fluctuations🎐
Alocasia are “steady-state” plants — they crave predictable conditions.Sudden swings in temperature can cause:
Drooping or limp leaves
Yellowing.
Leaf drop.
Slow or stalled growth.
Pests moving in as the plant becomes stressed.Fluctuations are more stressful than simply being on the low end or high end of their temperature range.Common sources of harmful temperature swings:
Air conditioners.
Heating vents.
Drafty windows.
Open doors in winter.
Nighttime cooling near glass.
Space heaters that turn on/off abruptly.Avoid placing Alocasia in any spot where temperature changes quickly throughout the day.
🌬️Warm Environments vs. Cool Environments🌬️
Warm, Bright Environment:
Your Alocasia will:
Drink more.
Grow faster.
Produce bigger leaves.
Benefit from higher humidity.
Need more frequent fertilizing.Cool, Dim Environment:
Your Alocasia will:
Slow down.
Produce smaller leaves.
Require much less water.
Become more susceptible to rot.
Edge closer to dormancy.This is one of the most important balancing acts for indoor Alocasia growers.🍁Seasonal Care: What to Expect in Each Season🍁
Alocasia respond to seasonal changes even indoors — because temperature and daylight shifts still affect them. Alocasia don’t grow on a constant, predictable “houseplant timeline.” Instead, they follow a seasonal, temperature-driven cycle shaped by millions of years of evolution in tropical and subtropical forests. Understanding their growth phases — and especially their dormancy triggers — is the secret to keeping them alive, happy, and less “dramatic.”
Many people think their Alocasia is dying when it’s actually following its natural rhythm.
Let’s walk through exactly what those rhythms are, why they happen, how to recognize them, and how to support your plant through each cycle.🌱Spring: Wake-Up Season🌱
Spring signals the beginning of active growth.
You’ll notice:
Faster soil drying.
New leaves emerging.
Pups or corm activity.
More demand for fertilizer.Spring care tips:
Increase watering frequency.
Start fertilizing again.
Repot or divide if needed.
Rotate the plant for even growth.
Raise humidity if it dropped over winter.☀️Summer: Peak Growth Season☀️
Summer is when Alocasia are happiest.
Expect:
Large, frequent leaves.
Higher water consumption.
Strong photosynthesis.
Increased pest resistance (with proper humidity).Summer care tips:
Maintain humidity 60–70%.
Water consistently.
Fertilize every 2–3 weeks.
Provide bright light or grow lights.
Watch for sunburn in west-facing windows.This is the season where your Alocasia truly show off.🍂Fall: Transition Season🍂
As temperatures cool and light decreases, Alocasia begin slowing down.
Expect:
Longer dry times.
Reduced growth rate.
Some leaf shedding.
Decreased nutrient demand.Fall care tips:
Reduce watering frequency.
Switch to lighter fertilizing.
Avoid repotting late in the season.
Keep away from cold windows as nights cool.
Increase humidity to avoid spider mites.This is the time to adjust your care so you don’t accidentally trigger rot.❄️Winter: Semi-Dormancy or Full Dormancy❄️
Winter can be confusing for new Alocasia owners. These plants follow temperature cues even if they’re indoors.
Alocasia may:
Grow slowly.
Produce tiny leaves.
Stop growing entirely.
Drop most or all leaves.
Enter full dormancy.This is normal and not a failure!!
Winter care tips:
Water less often.
Avoid cold drafts.
Do not fertilize unless under strong grow lights.
Do not unpot or disturb corms.
Maintain humidity above 45–50% if possible.
Keep temperatures above 65°F (18°C).If your Alocasia goes fully dormant:
Keep the soil lightly moist every 3–4 weeks.
Store in a warm spot away from direct sun.
Wait patiently — it will wake up in spring.🔥Heat Stress: What Happens When It’s Too Hot?🔥
Alocasia tolerate heat well, but they still have limits.
Signs of overheating:
Leaves droop midday.
Petioles soften.
Edges brown.
Soil dries too quickly.
Growth stalls in extreme heat.Common triggers:
Close contact with hot south/west windows.
Rooms over 90°F.
Grow lights placed too close.
Outdoor heat waves.How to help:
Increase humidity.
Move plant slightly away from window.
Increase airflow.
Water earlier in the day.🧊Cold Stress: The Silent Alocasia Killer🧊
Cold is far more dangerous than heat.
Signs your Alocasia got too cold:
Overnight drooping.
Sudden yellowing.
“Melted” or translucent leaves.
Soil staying wet for a long time.
Leaf drop within 24–72 hours.Cold shock often leads directly into:
Dormancy.
Root rot.
Corm rot.Always protect your Alocasia from cold windows, chilly floors, and drafty entryways.🏡Where to Place Alocasia in Different Seasons🏡
Winter Placement:
Away from drafty windows.
Not directly under a heating vent.
Near a grow light for warmth & brightness.
Grouped with other plants for humidity.Summer Placement:
Near bright windows.
Outdoors in shade (if temps stay above 65°F).
Avoid direct midday sun.
Ensure airflow to prevent pests.Spring/Fall Placement:
Transition slowly between locationsAvoid exposing the plant to sudden temperature changes.🌟The Golden Rule of Temperature for Alocasia🌟
Warm, bright, and stable wins every time.
Alocasia are much happier when:
Temperatures stay between 70–85°F.
They avoid cold drafts.
They aren’t exposed to rapid change.
Winter care is reduced.
Summer care is consistent.Master temperature = master Alocasia.
🌰The Role of Corms in Dormancy🌰
Corms are the Alocasia’s survival engine.
What they do:
Store water.
Store nutrients.
Store energy.
Enable the plant to restart growth after leaf loss.
Duplicate themselves to create pups.A healthy corm can survive months of dormancy and still regrow.How to check corm health without unpotting:
Gently press the soil surface.
If the base of the stems feels firm = healthy.
If the base of the stems feels mushy = rot has startedIf you do unpot a dormant Alocasia, you’ll often find:
A big, firm mother corm.
Smaller, firm cormlets.
Little to no active roots during dormancy.
This is all normal!
❓Common Dormancy Misconceptions❓
❌ “My Alocasia died because all the leaves fell off.”
No - it probably went dormant.❌ “I should water more to stop leaf drop.”
No - watering more is the fastest way to rot the corm.❌ “Dormancy means I did something wrong.”
No - it most likely means that your environment got cooler or darker.❌ “If the plant is dormant, roots won’t rot.”
No - roots rot more easily in cold, wet soil.❌ “I should repot during dormancy.”
Absolutely not! That’s when the plant is most vulnerable.
💤How to Care for a Dormant Alocasia💤
Dormancy care is simple but VERY different from active season care.
🌡️Keep Warm🌡️
Aim for 65 - 75°F (18 - 24°C).
Warmth wakes the plant up.💧Water Lightly💧
Water only enough to keep the soil slightly moist.
Typically:
Once every 3–4 weeks.
Or when soil is fully dry and the pot feels very light.🌤️Give Bright Light🌤️
Even though it’s not growing, light helps:
Prevent full shutdown.
Encourage earlier spring growth.
Maintain root health.🍃Do Not Fertilize🍃
Dormant roots cannot process nutrients.🪴Do Not Repot🪴
Repot in spring ONLY, when new growth begins.🧼Increase Humidity🧼
Prevents mites from attacking a weakened plant.🌱Watch for Signs of Wakening🌱
New growth often begins:
In later winter.
After a warm spell.
Under stronger light.
When daylight increases.
When you see a new leaf emerging - resume normal care slowly.
🌸How to Wake an Alocasia from Dormancy Faster🌸
You can encourage earlier growth by:
Increasing light (grow light 10 - 12 hrs/day).
Keeping temps above 70°F.
Watering slightly more once a new leaf point appears.
Adding a humidity boost.
Gently warming the root zone (soil heating mats work wonders).
Never force-feed fertilizer - wait until true growth begins.🌱Why Some Alocasia Enter Dormancy and Others Don’t🌱
Each plant responds differently depending on:
Species.
Temperature.
Light levels.
Soil moisture.
Age of the plant.
Size and health of the corm.
Examples of Species more likely to go dormant:
Alocasia Polly
Alocasia Amazonica
Alocasia Odora
Alocasia Macrorrhiza
Alocasia Regal ShieldExamples of Species less likely to go fully dormant:
Frydek
Dragon Scale
Melo
Silver Dragon
CupreaHybrids vary, but velvety aroid-types often stay semi-active in winter under good light conditions.
🌟The Golden Truth About Dormancy🌟
Dormancy is not death - it’s the plant hitting the pause button.
Alocasia have evolved this cycle to survive harsher seasons.
A healthy corm can regrow even after:
Losing all leaves.
Going bone-dry during dormancy.
Surviving cold stress.
Suffering from root loss.Your job is simply to:
Keep the corm alive.
Maintain warmth.
Avoid overwatering.
Wait patiently.Dormancy isn’t something to fear - it’s something to understand. Master this cycle, and you’ll master Alocasia.
🌱Root Systems & Corms in Alocasia🌱If you want to truly understand Alocasia - not just keep them alive, but grow them into thriving, statuesque masterpieces - you need to understand what’s happening underground. Root systems and corms are the beating heart of Alocasia growth, survival, reproduction, and recovery.Most plant parents focus on the leaves… but with Alocasia, the real action is happening in the soil.
🌿Understanding the Roots: Thin, Fast, and High-Maintenance🌿Alocasia roots are very different from thick, woody houseplant roots. They are:
Thin and fibrous.
Extremely oxygen-hungry.
Fast-growing in warm, bright conditions.
Quick to rot in cold, wet, or compacted soil.
Highly responsive to environmental changes.Why their root structure matters:
They need air as much as water
Dense soil suffocates them - literally. Without air pockets, roots cannot breathe, and rot sets in fast.
They grow and die back seasonally
It’s normal for Alocasia to shed some roots during winter or stress periods.
They’re built for tropical forest floors
Loose leaf litter, decaying wood, and fast-draining substrate shape their natural environment.They root quickly in warm soil!!
Warmth = rapid new root growth
Cold = root slowdown and rot riskHealthy Alocasia roots look like:
Bright white or cream.
Firm, not mushy.
Spreading outward or downward.
Numerous, fine root hairs visible.Unhealthy roots look like:
Brown
Black
Mushy
Foul-smelling
Hollow or stringyIf the roots are unhealthy, the plant cannot drink - leading to drooping, yellowing, pests, and stalled growth.
🌰Corms: The Powerhouse of the Plant🌰Corms are the single most misunderstood part of Alocasia biology - and the key to their resilience.Think of a corm as:
A storage battery.
A life raft.
A reproduction chamber.
A survival organ.
A backup generator.This is why an Alocasia can lose all its leaves and still come back months later!What a corm actually is:
A corm is a swollen underground stem that stores:
Water
Carbohydrates (energy)
Nutrients
Growth hormones
Genetic materialAlocasia rely on corms during:
Dormancy
Stress
Under-watering
Cold spells
Leaf loss
Root lossA firm corm = a living plant.
A mushy corm = rot and potential plant death.
🌱Mother Corm vs. Cormlets (Offsets)🌱Every mature Alocasia has:
1. A central “mother corm”
Large, firm, powerful.
This is the main storage organ.2. Smaller developing cormlets.These form around the mother corm and eventually become:
Pups
New plants
Propagation candidatesOver time, a single Alocasia can produce dozens of cormlets beneath the soil surface.This is one reason repotting can be so rewarding - people often discover a treasure trove of baby corms they had no idea were there.🐣How Pups Form (The Underground Strategy)🐣Pups form when:
The mother corm has enough stored energy.
Conditions are warm and bright.
The plant is not under severe stress.
The soil is loose enough to allow expansion.The corm sends out lateral growth points, which start as tiny white nubs.
These gradually:
Form a small cormlet.
Begin growing leaf tissue.
Push upward through the soil.
Emerge as a new baby plant.This process can take:
4–8 weeks in summer.
8–12+ weeks in winter or low light.
Even longer in compacted soil.Signs your plant is about to push a pup:
New growth from the soil instead of the main stem.
Slight soil mound or bump.
Increased water intake.
New leaf slowdown (energy diverted downward).Not all varieties pup equally.
Some, like Dragon Scale, Amazonica, and Odora, pup abundantly.
Others, like Melo or Cuprea, are more stingy.
🔁Root & Corm Cycles Through the Seasons🔁Understanding seasonal cycles makes everything easier:Spring/Summer (Active Growth):
New roots form rapidly.
Corm swells with energy.
Pups form most readily.
Soil dries faster.
Plant is “building up its reserves”.Fall (Transition Phase):
Root growth slows.
Corm holds onto energy.
Less nutrient transport.
Soil stays wet longer.Winter (Dormancy):
Roots may partially die back.
Corm goes into “survival mode”.
Minimal water uptake.
Leaf loss may occur.
Plant lives off stored energy.This is why watering too much in winter leads to rapid rot.
🧬Why Corms Make Alocasia Surprisingly Resilient🧬Most houseplants cannot recover from:
Full leaf loss.
Severe underwatering.
Root damage.
Being chopped off at the soil line.But Alocasia can - because corms exist!!A healthy corm can resurrect a plant even after:
Spider mite infestations.
Overwatering incidents.
Cold shock.
Transport damage.
Full dormancy.
Being cut back intentionallyThis is what makes Alocasia propagation so fun (and so forgiving)!🪴How to Support Root and Corm Health🪴
Use a chunky, well-aerated mix -
Corms need oxygen just as much as water.Keep the soil warm -
Warm root zones = active growth.
Cold soil = rot.Water when the top 1–2 inches dry -
This prevents drowning the delicate root hairs.Avoid repotting during winter -
Roots are weakest during dormancy.Add beneficial bacteria -
Products like EM-1 or Hydroguard help prevent rot.Increase light -
More light = more photosynthesis = more corm energy storage.Don’t remove pups too early -
Let them grow 3–4 leaves before dividing.
🛠️What to Do if an Alocasia Loses All Its Roots🛠️
This happens more often than people admit - but it is NOT the end.If a plant has no roots:
Keep the corm warm.
Place in slightly moist sphagnum.
Add gentle warmth (heat mat ~75–80°F).
Provide bright light.
Maintain moderate humidity.
Avoid overwatering.You'll often see:
New roots in 2–4 weeks.
New leaf points in 3–8 weeks.
Corms are built to come back!!🌟The Golden Rule of Roots & Corms🌟
Healthy corm = healthy plant!!If you protect the corm:
The roots will regenerate.
The leaves will return.
The plant will survive stress.
Pups will multiply.
Growth will resume seasonally.Roots grow from the corm - the corm drives everything!This is why understanding and supporting corm health is the key to mastering Alocasia care.
🌿Propagation of Alocasia🌿Propagating Alocasia is equal parts science, treasure hunt, and magic. Unlike many houseplants that rely on stem cuttings, Alocasia reproduce almost exclusively through corms, pups, and root divisions. These underground growth structures give Alocasia their incredible resilience - and make them surprisingly easy (and very fun!) to propagate once you understand how they work.Propagation is never one-size-fits-all. Different species, different ages, and different seasons influence how easily an Alocasia will produce new plants. This section breaks down every major propagation method, how to do it safely, and when to avoid attempting propagation altogether.🌱The Three Primary Propagation Methods for Alocasia🌱
See at the very end a bonus section on propagating via pollination
1) Separating pups (the easiest and safest)2) Corm propagation (the most fun + the most nerdy)3) Root or rhizome division (best for large, mature plants)Cuttings of leaves or petioles do not work for Alocasia - only methods involving corm tissue are successful.
🐣Propagating Alocasia by Separating Pups🐣(Beginner-friendly, very reliable, low risk)Pups are baby plants formed from cormlets connected to the mother corm via small root-like structures. When separated correctly, they become instant starter plants.🌱When to Separate Pups🌱
Timing is everything.Ideal time:
Late spring.
Summer.
Early fall.When temperatures are warm and the plant is actively growing, pups root faster and recover better.Avoid separating pups when:
The plant is entering dormancy.
The plant is currently stressed (pests, rot, underwatering).
It’s winter and the plant has slowed significantly.
The mother plant has fewer than 2–3 leaves.Healthy mother = healthy pups.🌿How to Identify a Pup That’s Ready🌿
A pup is ready to separate when:
It has at least 2 leaves and its own root system (look for white roots coming from the base).
It’s not too tiny (bigger than a grape is a good rule).
The connection to the mother corm is narrow or easily visible.
If a pup is still tiny, or tightly fused with the mother corm, waiting a few more weeks is always safer.🌼How to Separate a Pup (Step-by-Step)🌼
1) Remove the mother plant from the pot.
Be gentle; avoid shaking or tugging.2) Brush away the soil
Expose the root ball and corms.3) Locate the pup(s)
Find where it attaches to the mother corm.4) Use your fingers first
Gently pull apart roots to find the connection point.5) Cut only if necessary
Use a sterile knife or scissors to cut the small connector tissue.6) Keep the mother corm intact
Never cut into the main corm unnecessarily.7) Pot the pup separately
Use a chunky, airy aroid mix or your choice of alternate substrate.8) Provide high humidity + gentle light
A grow light and 60–70% humidity helps immensely.9) Keep the soil slightly more moist in the first 1–2 weeks until the pup stabilizes.
Pups typically fully root and stabilize within 4–8 weeks.
🌰Propagating Alocasia From Corms🌰
(Intermediate level, extremely fun, very rewarding)Corm propagation is the plant nerd equivalent of uncovering buried treasure.When you unpot an Alocasia, you may find:
Tiny white cormlets the size of peas
Larger corms the size of marbles
Even big thumb-sized corms
All of them can become new plants.🔍How to Identify a Viable Corm🔍
A viable corm is:
Firm.
Smooth or slightly textured.
Beige, white, brown, or tan.
Not mushy.
Not hollow.
Not blackened or slimy.
If it’s squishy or smells foul — discard it.
If it’s firm, it will sprout (sometimes this can take months!)
🌿Three Primary Methods for Corm Propagation🌿Below are the most common and successful techniques plant parents use.⭐ Method 1: (Semi-Hydro Method and our preferred method)
50/50 Perlite/ Fluval Stratum Propagation MethodWhy this works:
Great for preventing rot
High airflow
Low chances of fungal issues
Easy to maintain consistent moistureHow to do it:
1) Acquire a "self-watering corm cup" (these can be bought or made) Check out the ones that we provide on our Palm Street lives and shop!!2) Add your normal fertilized water mix to the "water reservoir" part (bottom) of the setup.3) Ensure that the wick (cotton string) is installed in the hole in the middle of the tray.4) Fill the tray (the part where the corm will ultimately be placed) with the 50/50 mixture.5) Wet down the 50/50 mixture with the same water mixture that you filled the water reservoir with.6) Place the corm, attachment side down into the 50/50 mixturethe the top 25% - 50% out of the mixture.This method is extremely rot-resistant and great for enthusiasts of every level.Method 2: Sphagnum Moss MethodWhy it works:
Moss holds moisture.
High airflow prevents rot.
Perfect humidity for sprouting.How to do it:
1) Hydrate long-fiber sphagnum until damp (not dripping).2) Place corm on top of moss or gently nestle it halfway.3) Use a shallow container or propagation box.4) Keep warm — 75–85°F is ideal.5) Provide bright light (grow light is perfect).6) Keep moss moist, not wetWhen to expect growth (on average):
First root: 2–6 weeks.
First leaf point: 4–10 weeks.Some species sprout faster than others and some are much much slower.Method 3: Water Propagation(In our opinion this is riskier but can be very effective for larger corms)Best used for:
Big corms.
Corms with visible growth points.How to do it:
Place the corm in shallow water (¼–½ inch).
Change water every few days.
Keep warm and under a grow light.
Move to soil or moss once roots reach ½–1 inch.This method provides fast sprouting, but can rot if water is stagnant or too deep.🌱How to Pot Up Sprouted Corms🌱When your corm sprouts:
It will form roots first.
Then a tiny, spear-shaped leaf point.
Then its first baby leaf.Pot the corm at the very earliest when:
(NOTE: This is the VERY EARLIEST and we generally leave ours in the corm cups much longer)
Roots are at least ½ inch long.
The sprout looks stable.
The first leaf is emerging or about to appear.Use:
A small pot (too big = rot risk).
A well-draining aroid mix or your preferred substrate.
High humidity (but not soaked soil).
Steady warmth.Expect slow growth at first - the plant is establishing root structure.
🔁Propagating by Root Division🔁This method works best for large, mature Alocasia.How to divide:
Unpot the plant.
Look for natural separations in the root mass.Only divide when each section has:
A chunk of corm.
A few roots.
At least one growth point.This works especially well with:
1) Odora
2) Macrorrhiza
3) Regal Shield
4) PortoraBut is rarely used for delicate species like Melo or Cuprea.
🧬Species Differences in Propagation🧬Some Alocasia are “pup or corm factories.” Others… not so much.Heavy pup producer examples:
1) Amazonica (Polly)
2) Odora
3) Macrorrhiza
4) Dragon Scale
5) Regal ShieldModerate pup producer examples:
1) Frydek
2) Silver Dragon
3) Yucatan PrincessRarely pup or slow grow examples:
1) Melo
2) Cuprea
3) Black Velvet
4) Low-level species hybrids
These often rely more on corm propagation than pup production.
🧪Common Propagation Mistakes (and How to Avoid Them)🧪❌Overwatering new pups
Roots are fragile - keep soil lightly moist.❌Using soil that’s too dense
Remember: oxygen is life for roots.❌Separating pups too early
Small pups die easily when removed too soon.❌Propagating during winter dormancy
Low temps + low light = rot.❌Burying corms too deep
Corms need air even while sprouting.❌Not providing warmth
Propagation thrives at 75–85°F.
🌟The Golden Rule of Alocasia Propagation🌟Warmth + Bright Light + Moist Airflow = Successful Propagation.If you give your corms and pups:
Warm soil.
Elevated humidity.
Bright, indirect light.
Chunky, breathable substrate.
Consistent but careful watering.They will sprout, root, grow, and multiply - sometimes faster than you expect (and sometimes MUCH slower).Alocasia are natural survivors and natural reproducers. Once you master their corms, propagation becomes one of the most satisfying parts of keeping them.
🌿Root Health & Up-Potting🌿Alocasia roots are delicate, sensitive, and incredibly important — they’re the first part of the plant to react to environmental changes, and often the earliest indicator that something is wrong. Healthy roots mean healthy leaves, steady growth, and fewer pests. Unhealthy roots lead to nearly every problem Alocasia owners experience, from yellowing leaves to sudden dormancy or rot.Understanding what healthy roots look like, how they grow, and how to up-pot properly is essential for long-term Alocasia success.
🌱Understanding Alocasia Root Behavior🌱Alocasia root systems are unique compared to many houseplants.They are:
Thin and fibrous (great at absorbing water, but easy to damage).
Fast-growing in warm seasons.
Slow or stalled in cold seasons.
Extremely oxygen-dependent.
Highly responsive to light, temperature, and moisture.Because of these traits, Alocasia roots thrive when the environment is stable — and react dramatically when it’s not.Healthy Alocasia roots will:
Be white, cream, or lightly tan.
Feel firm and flexible.
Spread evenly through the soil.
Smell earthy, not sour.
Regrow rapidly in warm, bright conditions.Unhealthy roots will:
Be brown, black, or translucent.
Feel mushy, slimy, or stringy.
Come off easily when tugged.
Smell sour or rotten.
Stop absorbing water, causing leaves to droop even right after watering.When roots struggle, the entire plant suffers - especially the corm.
🍂Common Root Stress Mistakes🍂These are the most frequent causes of root decline:1. Overwatering + Dense Soil -
The fastest way to rot the root system:
No airflow.
Anaerobic (oxygen-poor) conditions.
Bacterial rot.2. Cold Soil
Roots essentially shut down under ~60°F (15°C).
Cold + wet = rot3. Underwatering (Repeat Cycles)Leads to:
Shriveling of root hairs.
Hydrophobic soil.
Stunted growth.4. Oversized Pots
Too much soil = too much moisture retention.
This along with dense soil is one of the top causes of Alocasia root rot.5. Disturbing Roots in Dormancy
Winter root systems are fragile and easily damaged.
🌿The Root Zone: Where Plant Health Begins🌿Alocasia root health depends on three things:1. Airflow (oxygen)
Chunky, aerated soil prevents rot.2. Moisture balance
Consistent moisture - not soggy, not bone-dry.3. Warmth
Roots grow far faster above 70°F.When these three needs are met, roots flourish.
🪴Signs Your Alocasia Is Ready to Up-Pot🪴Alocasia prefer to be slightly snug in their pots. They do not appreciate having too much space — it leads to wet soil pockets and root suffocation.
Only up-pot when necessary.Your Alocasia is ready to move up a pot size if:
Roots are circling the bottom.
Visible through drainage holes.
Soil dries out extremely fast (1–2 days).
Indicates roots are taking up most of the pot.
The plant becomes top-heavy.
Pot tips over when touched.
Multiple pups crowd the space.
Two or more pups pressing against the pot walls.
The mother corm is pressing up against the pot side.
New growth is being inhibited.
Smaller leaves than normal.
You see roots growing upward toward the soil surface seeking oxygen.If none of these signs are present, your plant is not ready to up-pot.
⚠️When NOT to Up-Pot⚠️Avoid up-potting in these situations:
Winter or dormancy.
(Roots aren’t actively growing and won’t recover from disturbance)After leaf loss or stress.
(Give the corm time to stabilize)If soil is already staying wet for too long.
(Fix the soil, not the pot size)After a pest infestation
(Treat pests first)Up-potting at the wrong time is a major cause of plant decline.
🪴How Much Bigger Should the Next Pot Be?🪴This is critical:
Only size up by 1–2 inches diameter.Examples:
4-inch pot - move to 5–6 inch
6-inch pot - move to 7–8 inchAnything larger can cause:
Soil staying wet too long.
Root rot.
Dormancy triggered by root shock.
Sudden leaf loss.Alocasia prefer gradual steps, not giant leaps.
🌱The Up-Potting Process (Step-by-Step)🌱Here is a gentle, safe method that prevents root shock:1) Choose the Right Soil
See our substrate recipes above in the Soil Section.2) Very Lightly Water the Day Before
Slightly moist soil helps roots slide out gently.
Do not up-pot when bone-dry or soaking wet.3) Remove the Plant Carefully
Hold the base, squeeze the pot if plastic, tilt, and slide out.
Never pull on the leaves or stems.4) Inspect the Roots
Look for:
White/cream roots = healthy
Mushy brown roots = rot
Dry shriveled roots = past underwateringIf rot is present:
Trim mushy sections with sterile scissors.
Rinse lightly if needed.
Apply cinnamon or fungicide (optional)5) Place in the New Pot (we recommend self-watering pots)
Add fresh substrate to the bottom so the corm sits at the same height as before.
Do NOT bury the corm too deep.
Position the plant in the center (make sure to position the roots in an umbrella shape with the corm in the center) and fill in gently with the new mix.6) Lightly Water In
Just enough to settle the soil around the roots.7) Provide Warmth + Bright LightThe “recovery formula” after up-potting:
Warm air (70–80°F).
Good light (grow lights are perfect).
Moderate humidity (50–70%).Avoid:
Direct sun.
Cold air.
Overwatering.
New roots will begin exploring the fresh soil within 1–3 weeks.
🌱How to Handle Root-Bound Alocasia🌱If your Alocasia is very root bound:
Gently loosen the bottom roots.
Do not aggressively tear the root mass.
Remove as much of the old soil as possible if it is at all compacted.
Maintain root integrity as much as possible (remember: Alocasia tend to have fragile root systems).
Alocasia recover best from gentle handling.
🌰How Up-Potting Affects the Corm🌰The corm responds to up-potting by:
Expanding root production.
Increasing water uptake.
Preparing for larger leaves.
Sometimes initiating new pups.This is why repotting in spring often leads to a flush of new growth.
But if the pot is too large, the corm becomes stressed, not stimulated.
🧪Signs Your Plant Is Recovering Well After Up-Potting🧪Your Alocasia should show:
A new leaf forming within 4–8 weeks.
Stronger petioles.
Steady soil drying pattern.
Increased water intake.
No yellowing.
Pups forming (optional but exciting).If the plant stalls or wilts, check:
Light.
Temperature.
Soil moisture.
Pot size.Often the issue is simply watering too much or substrate issues after repotting.
🌟The Golden Rule of Root Health & Up-Potting🌟Only disturb roots when they are actively growing.
If roots are thriving in warm weather + bright light, the plant will bounce back quickly. If roots are cold, stressed, or dormant, any disturbance risks rot or leaf loss.If You Give Alocasia:
Chunky soil.
Proper pot size.
Warmth.
Consistent moisture.
Bright light.The roots will thrive - leading to bigger, healthier plants from the ground up.
🐛🌿Pest Management & Common Problems in Alocasia🌿🐛Alocasia are stunning and bold plants — but they are also expressive, sensitive, and quick to show when something isn’t quite right. Almost every Alocasia parent eventually faces problems like yellowing leaves, pests, drooping stems, or seasonal dormancy confusion. The good news?These plants are predictable. Once you know how Alocasia communicate stress, diagnosing and fixing issues becomes easy — and even pests become manageable.Below is our comprehensive guide to identifying, preventing, and treating the most common Alocasia problems, with a heavy focus on pest management, because Alocasia are spider mite magnets without proper care.🕷️ Pest Management: Alocasia’s Greatest Challenge🕷️Alocasia attract pests more readily than many houseplants due to their:
Thin epidermis on velvety species.
High transpiration rate.
Seasonal growth slowdowns.
Need for warm, humid air.
Sensitivity to stress.When an Alocasia becomes stressed (low humidity, low light, cold temps, underwatering), pests sense an opportunity.
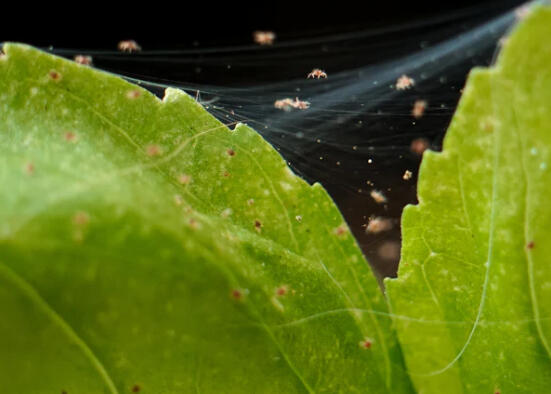
🕷️ 1. Spider Mites (Enemy #1)Spider mites are the most common and most destructive pest Alocasia face.Signs of spider mites:
Tiny white, yellow, or silver speckling.
Webbing between stems or leaf undersides.
Edges of leaves crisping.
Leaves looking faded or dusty.
Drooping despite proper watering.
Mites visible with a flashlight or magnifying glass.Why they love Alocasia:
Dry air.
Warm temperatures.
Thin, tender leaf tissue.
Plants in winter slowdown.How to treat spider mites:
Step 1: Physical removal
Rinse plant thoroughly in the shower or sink.
Pay special attention to undersides and stem bases.Step 2: Use a miticide or neem oil
Options:
Neem oil.
Insecticidal soap.
Rubbing alcohol + water mix.
Avid, Forbid, or other miticides for heavy infestations.Step 3: Repeat treatments
Spider mites have eggs that hatch later. Treat every 3–5 days for 2–3 weeks.Step 4: Increase humidity
Mites HATE humidity.
Alocasia LOVE humidity.
This is your biggest long-term defense.

🦟2. Thrips🦟Thrips are sneaky, fast, and love velvety Alocasia species.Signs of thrips:
Silvery streaks.
Distorted new leaves.
Black specks (frass).
Thin or papery leaf texture.
Small black/brown insects on leaf undersides.Treatment:
Sticky traps (blue traps are better for thrips).
Neem oil or insecticidal soap.
Systemic insecticides (for severe infestations).
Cut off heavily damaged leaves.
Thrips often require multiple treatment methods at once.🦠Fungus Gnats🦠
Gnat issues almost always signal overwatering or dense soil.Signs:
Little black flies around the soil.
Larvae visible in wet topsoil.
Yellowing or mushy stems.Treatment Options:
Let top soil dry 1–2 inches and add a layer of vermiculite or LECA on top.
Use BTi (Mosquito Bits) in water.
Use sticky traps (yellow ones tend to work best).Healthy corms will survive gnats, but roots can be weakened.
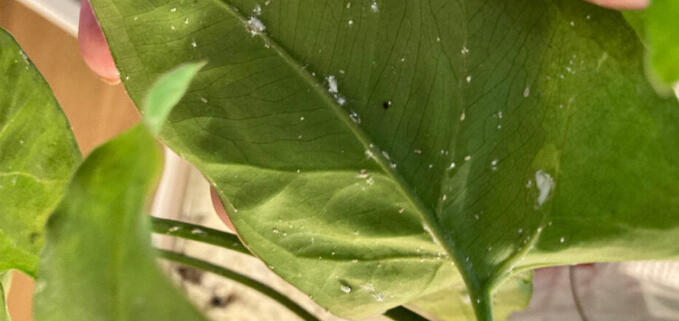
🐞4. Mealybugs🐞Less common but still possible, especially in leaf axils.Signs:
White cottony clusters.
Sticky residue.
Leaf tips curling or distorting.Treatment:
Remove clusters manually.
Treat with alcohol on a cotton swab.
Follow up with neem or systemic treatment.
🐛Prevention: The True Secret to a Pest-Free Alocasia🐛
Keep humidity above 55–60%.
(Low humidity = open invitation to mites)Provide bright, stable light.
(Mites prefer stressed plants)Maintain consistent watering.
(Underwatering = weak plants = pests)Clean leaves regularly.
Dust = blocked light = slower growth = pest vulnerability.Quarantine new plants.
Alocasia spread pests easily, especially mites and thrips.Add airflow
A small clip-on fan dramatically reduces pest issues.
🍂Common Environmental Problems & What They Mean🍂Many Alocasia problems are not pests — they are environmental stress signals.Below is a quick diagnostic guide for some of the most common ailments.🍁1. Yellow Leaves🍁
Causes:
Normal aging (lower leaves die off — VERY normal).
Overwatering.
Underwatering.
Low light.
Cold temperatures.
Sudden light change.
Fertilizer imbalance.
Post-dormancy stress.How to fix:
Address watering rhythm.
Increase light.
Keep temps stable.
Check roots for rot.
Stop fertilizing in winter.
🌫️2. Drooping or Limp Leaves🌫️
Causes:
Underwatering.
Overwatering (yes, both cause drooping!).
Low humidity.
Cold drafts.
Root damage.
Recent repotting.
Dormancy onset.Solutions:
Check soil moisture
Ensure warmth.
Improve humidity.
Add gentle airflow.
Keep light consistent.
🔥3. Brown Crisping Edges🔥
Causes:
Low humidity.
Too much direct sun.
Salt buildup from fertilizer.
Temperature fluctuations.
Underwatering.Fix:
Increase humidity.
Filter harsh sunlight.
Flush soil every 4–6 weeks.
Water consistently.
🌀4. Curling Leaves🌀Alocasia curl leaves as a protective mechanism.Causes:
Underwatering.
Low humidity.
Too much light.
Thrips.
Heat stress.Fix:
Improve humidity.
Move away from intense light.
Inspect for pests.
Water consistently.
🍂5. Sudden Leaf Drop🍂
Causes:
Temperature shock.
Low light.
Overwatering / root rot.
Dormancy.
Post-shipping stress.
Repotting at the wrong time.Fix:
Stabilize environment.
Check the corm.
Reduce watering.
Increase warmth.
Add grow lights.If the corm is firm, the plant will come back.
❄️6. Winter Stalls, Mini Leaves, or No Growth❄️
Causes:
Dormancy.
Low light.
Cold soil.
Overwatering.
Under-feeding in active season.Fix:
Add a grow light.
Keep temperatures above 68°F.
Reduce watering.
Wait for spring (Can't believe that we had to put this one in here...lol).
🌧️Watering-Related Problems🌧️Alocasia often tell you there’s a watering issue long before the soil looks suspicious.💦1. Overwatering💦
Symptoms:
Yellow leaves.
Mushy stems.
Fungus gnats.
Black spots.
Soil smells sour.
Corm feels soft.Fix:
Repot in fresh, airy mix.
Trim rotten roots.
Increase airflow.
Add beneficial bacteria.🔥2. Underwatering🔥
Symptoms:
Drooping that improves after watering.
Dry, crisp edges.
Soil pulling away from the pot.
Small new leaves.Fix:
Deep watering.
Improve soil water retention.
Use bottom watering occasionally.
🌱Root & Corm Problems🌱Since the corm is the heart of the plant, root/corm issues are critical.🦠Root Rot🦠
Causes:
Dense soil.
Overwatering.
Cold + wet conditions.Solutions:
Remove plant from pot.
Cut away mushy roots.
Apply cinnamon or fungicide.
Repot in chunky aroid mix.
Provide warmth and light.🌰Soft or Mushy Corm🌰
This is an emergency!!!Causes:
Prolonged rot.
Very cold temperatures.
Overwatering in winter.
Bacterial/fungal infection.Fix:
If part of the corm is still firm:
Cut off mushy areas.
Dust with cinnamon.
Let callous for 24 hours.
Place in warm sphagnum until new roots appear.If the whole corm is mushy... the plant cannot be saved.
🌞Light-Related Problems🌞☀️Leaf Burn / Scorching☀️
Causes:
Direct afternoon sun.
Too close to grow lights.
Sudden move from shade to sun.Fix:
Filter or reduce light.
Raise grow lights.
Acclimate plants gradually.🌑Stretching / Leggy Petioles🌑
Causes:
Low light.
Light too far away.
Too many obstructions (crowded plant shelf).Fix:
Move closer to the window.
Add grow lights.
Rotate the plant regularly.
🌟The Golden Rule of Alocasia Problem-Solving🌟Alocasia problems almost always trace back to one or more of 5 things:
Pests, Light, humidity, temperature, or watering.Fix the environment: the plant rebounds.
Fix the root cause: leaf size increases.
Fix the routine: pests become rare.Alocasia are expressive plants — and once you learn their language, you’ll be able to diagnose and correct issues quickly and confidently.
🌟Concluding Tips for Thriving Alocasia🌟Alocasia may have a reputation for being dramatic, but once you understand their rhythm, they become some of the most rewarding plants you can grow. Their bold leaves, tropical architecture, and expressive nature make them true standouts in any space - and with consistent care, they will reward you with steady growth, new pups, and the kind of transformation that keeps plant parents hooked.🌱1. Consistency Beats Perfection🌱Alocasia don’t need perfect conditions - they just need stable ones.They thrive when:
Light stays bright and predictable.
Humidity stays above 55–60%.
Temperatures remain warm.
Watering follows a rhythm, not a schedule.
Soil is breathable and airy.
Fluctuations stress them far more than “less than ideal” settings.💡2. Focus on the Environment, Not the Symptoms💡Almost every problem Alocasia experience ties back to 5 core factors:
Light.
Temperature.
Humidity.
Moisture balance.
Pests.If something looks off — yellow leaves, crispy edges, curling, drooping - check the environment first and than the plant.
Fixing those factors solves 90% of issues.🌿3. Don’t Fear Dormancy🌿Dormancy is not death — it’s an ancient survival strategy.A leafless Alocasia with a firm corm is simply sleeping.
Keep the soil lightly moist.
Provide gentle warmth.
Add bright light.
Wait patiently for spring.With the right care, they’ll wake up bigger and stronger than before.🪴4. Healthy Roots = Healthy Leaves🪴Your Alocasia’s beauty starts underground.Chunky aroid mix prevents rot.
Warm roots encourage growth.
Good airflow keeps roots oxygenated.
Proper pot size prevents soggy soil.
If the roots and corm are healthy, the leaves will follow.🔧5. Learn Your Plant’s Language🔧Alocasia are highly communicative.
They will quickly tell you:
When they want more light.
When they’re thirsty.
When humidity is too low.
When they’re stressed.
When they’re cold.
When they want to grow.
And when they need a breakWatching and responding to their cues is the true art of Alocasia care.🧪6. Warmth + Light = Bigger Leaves🧪Almost everything Alocasia do - from leaf size to pup production - improves dramatically under:
Bright, indirect light.
Consistent warmth.
Stable humidity.When environmental factors are aligned, their leaves get larger, fuller, and more architectural.💧7. Water Deeply But Wisely💧Alocasia don’t like constantly wet soil, but they do appreciate:
Deep watering.
Quick drainage.
Slight drying between cycles.This rhythm mimics tropical rain patterns and helps prevent both root rot and dehydration.🧼8. Keep Leaves Clean + Airflow Moving🧼Clean leaves and a gentle breeze keep pests at bay and maximize photosynthesis.Wipe leaves every few weeks.
Keep dust off velvety species.
Add a low-speed fan nearby for airflow.
Quarantine new plants.Healthy leaves are more resistant to mites, thrips, and fungus!🌱9. Let Pups Grow Before Separating🌱If you want strong plants and big leaves - allow pups to mature naturally before removing them.
Pups help the mother corm grow stronger, and early removal can stall the plant’s progress.💗10. Don’t Stress About Imperfection💗Every Alocasia loses leaves.
Every Alocasia will have a “bad week.”
Every Alocasia faces pests or stress occasionally.These plants are cyclical, reactive, and expressive.
They will bounce back from almost anything as long as:
The corm stays firm.
They receive proper care.
You stay patient and attentive.Their resilience is part of what makes them so special.🌿Final Thoughts: Enjoy the Journey🌿Alocasia are not “difficult” plants - they’re just plants that expect you to listen. They reward consistency, patience, and a willingness to learn. When you tune into their cues, you’ll discover that caring for them becomes deeply satisfying and strangely intuitive.Grow them with:
Curiosity.
Attention.
Respect for their natural cycles.…and they will thrive in your care.Whether you're an Alocasia beginner or a seasoned collector curating rare hybrids, the joy of watching these plants flourish is worth every bit of effort. Big leaves, bold shapes, dramatic personalities - that’s the magic of Alocasia.
BONUS #1
🌿Top 20 Alocasia Care FAQ - Questions & Answers🌿Q1: Why is my Alocasia drooping?
A: Drooping can be caused by:
Underwatering (most common).
Overwatering (roots aren’t absorbing water).
Low light.
Low humidity.
Temperature stress.
Post-repotting shock.Check the soil first. If it’s dry - water deeply.
If it’s wet - improve drainage and airflow.Q2: Why are my Alocasia’s leaves turning yellow?
A: Common reasons include:
Natural aging (lower leaves dying off).
Overwatering.
Poor drainage or root rot.
Lack of light.
Cold temperatures.
High fertilizer salts.If the yellowing is only on old leaves, it’s normal.
If it’s on new leaves - check roots and light.Q3: Why are the leaf edges turning brown or crispy?
A: Usually from:
Low humidity.
Underwatering.
Direct sun exposure.
Too much fertilizer.
Heat stress.Increase humidity (60%+), adjust watering, and avoid harsh sun.Q4: Why is my Alocasia’s new leaf so small?
A: Small leaves are almost always caused by:
Low light.
Insufficient nutrients.
Low humidity.
Cold temperatures.
Interrupted watering cycles.
Seasonal slowdown.Improving light is the biggest fix.Q5: How often should I water my Alocasia?
A: Water when the top 1–2 inches of soil are dry.
There is no fixed schedule — it depends on:
Light.
Temperature.
Humidity.
Soil type.
Season.
In summer: every 5 - 7 days.
In winter: every 10 - 21 days.Q6: My Alocasia lost all its leaves - is it dead?
A: Not necessarily!
Alocasia naturally enter dormancy under:
Low light.
Cold temperatures.
Seasonal changes.
Stress.If the corm is firm, the plant is alive.
Provide warmth, bright indirect light, and minimal watering until growth resumes.Q7: How do I know if my Alocasia is dormant?
A: Signs of dormancy:
No new leaves.
Soil stays wet longer.
Leaf drop (sometimes all leaves).
Slowed water intake.
Cold weather or short daylight.Dormancy is normal and reversible.Q8: Why does my Alocasia keep getting spider mites?
A: Spider mites thrive when:
Air is dry.
Plant is stressed.
Leaves are dusty.
Light is low.Prevent by:
Keeping humidity above 55–60%.
Wiping leaves.
Providing consistent light.
Adding gentle airflow.Treat by rinsing + neem or insecticidal soap every 3–5 days.Q9: Is my Alocasia getting too much sun or too little?
A: Too much sun: crisping edges, pale leaves, brown patches.
Too little light: long petioles, leaning stems, small leaves, fading color.Bright, indirect light is ideal.Q10: How often should I fertilize my Alocasia?
A: During active growth (spring - early fall):
Every 2 - 3 weeks with diluted liquid fertilizer or use a slow-release fertilizer every 3 - 4 months.
Do NOT fertilize during dormancy.Q11: What kind of soil mix is best for Alocasia?
A: A chunky, well-draining aroid mix:
Chunky Perlite
Orchid bark
Coconut coir or sphagnum moss
Worm castings
Horticulture CharcoalAlocasia roots need oxygen + consistent moisture.Q12: When should I repot my Alocasia?
A: Repot only when:
Roots are circling the pot.
Soil breaks down.
Plant dries out within 1–2 days.
Pups crowd the pot.
Best time: spring or early summer
Never repot in winter unless absolutely necessary.Q13: Why is my Alocasia curling its leaves?
A: Possible causes:
Underwatering.
Low humidity.
Too much direct light.
Heat stress.
Thrips infestation.Check moisture + humidity first, then inspect for pests.Q14: How do I encourage bigger leaves?
A:
Bright, stable light
Humidity 60–70%
Warm temps (70–85°F)
Consistent watering
Regular fertilizing
Don’t separate pups too earlyBigger leaves = more stored energy in the corm.Q15: Why does my Alocasia keep producing one leaf at a time?
A: That’s normal!
Alocasia typically grow one leaf at a time, replacing older leaves as new ones form. A healthy mature plant maintains 3 - 6 leaves on average.Q16: Why does my new leaf get stuck or tear when unfurling?
A: Common causes:
Low humidity.
Rapid drying.
Underwatering.
Nutrient deficiency.
Thrips.
Raise humidity and water consistently to fix.Q17: Are Alocasia toxic to pets?
A: Yes.
Alocasia contain calcium oxalate crystals that can cause mouth irritation and digestive upset if eaten. Keep away from pets and children.Q18: How do I propagate Alocasia?A:Three reliable methods:
Separate pups
Grow from corms
Divide the root ball (for large species)Stem cuttings do not work.Q19: Why does my Alocasia lean to one side?
A:
Growing toward the light.
Uneven light exposure.
Weak petioles from low light.
Rotate your plant weekly for balanced growth.Q20: What’s the #1 beginner mistake with Alocasia?
A: Overwatering in dense soil.
Alocasia roots need moisture, but also oxygen - soggy soil suffocates roots and causes rot quickly.Use a chunky aroid mix and water when the top 1–2 inches dry.
BONUS #2
🌿Top 50 Most Popular Alocasia (With Brief Descriptions)🌿
1. Alocasia Amazonica ‘Polly’ / ‘African Mask’
Dark arrow-shaped leaves with bold white veins; compact and very popular indoors.2. Alocasia Amazonica ‘Bambino’
A smaller version of Polly with narrower, elongated leaves.3. Alocasia Micholitziana ‘Frydek’
Velvety deep-green leaves with sharp white veins; beloved for its dramatic texture.4. Alocasia Micholitziana ‘Frydek Variegated’
Rare variegated version with creamy marbling; more sensitive and slow-growing.5. Alocasia Dragon Scale
Thick, quilted, almost reptilian leaves resembling dragon hide; highly sought after.6. Alocasia Silver Dragon
Silvery-gray leaves with dark veins; compact and jewel-like.7. Alocasia Green Dragon
Similar to Dragon Scale but a bit softer in color and more vigorous.8. Alocasia Baginda ‘Pink Dragon’
Shiny dark leaves with pink petioles; fast-growing and elegant.9. Alocasia Melo (Alocasia rugosa)
Thick, stone-like leaves with coarse texture; a true jewel Alocasia.10. Alocasia Cuprea ‘Red Secret’
Metallic copper-red leaves that shine like foil; small but dramatic.11. Alocasia Regal Shield
Large, upright leaves with maroon undersides; ideal statement plant.12. Alocasia Portora
A hybrid with large ruffled leaves; very hardy and fast-growing.13. Alocasia Odora
Tall, fragrant variety with large shield-shaped leaves.14. Alocasia Macrorrhiza ‘Giant Taro’
Huge leaves (up to 5 feet); commonly grown outdoors in tropical climates.15. Alocasia Macrorrhiza ‘Stingray’
Unique tail-like leaf tips that resemble a swimming stingray.16. Alocasia Macrorrhiza ‘Black Stem’
Same giant leaves as macrorrhiza but with deep purple-black stems.17. Alocasia Sarian
Tall, narrow leaves with a speckled green-and-white petiole pattern.18. Alocasia Calidora
Elephant ear-style leaves; sturdy and great for outdoor tropical gardens.19. Alocasia Lowii ‘Wavy’
Rippling, narrow leaves with pronounced waves along the edges.20. Alocasia Zebrina
Famous for its zebra-striped stems and large arrow-shaped leaves.21. Alocasia Melo Variegata
Rare variegated form of Melo with creamy marbling.22. Alocasia Platinum
Bright silvery leaves with soft metallic sheen; compact growth.23. Alocasia Black Velvet
Dark velvety leaves with sharp silver veins; compact and elegant.24. Alocasia Black Velvet Variegata
Highly collectible variegated form with white streaking.25. Alocasia Azlanii
Metallic purple leaves that darken with age.26. Alocasia Hilo Beauty
Variegated camouflage-like pattern of light and dark green.27. Alocasia Reversa
Unique reversal of vein patterns - dark veins on lighter green leaves.28. Alocasia Wentii
Green leaves with deep purple undersides; hardy and beginner-friendly.29. Alocasia Longiloba
Long, arrowhead-shaped leaves with crisp white venation.30. Alocasia Sinuata
Glossy, blistered leaves; compact and jewel-like.31. Alocasia Tiny Dancer
Small, whimsical leaves on slender petioles; playful, cute growth habit.32. Alocasia Jacklyn
Deeply lobed leaves with black venation; extremely collectible.33. Alocasia Lauterbachiana (‘Purple Sword’)
Long, thin leaves with purple undersides; sword-like and architectural.34. Alocasia Yucatan Princess
Large glossy leaves with maroon stems; vigorous grower.35. Alocasia Infernalis ‘Black Magic’
Nearly black metallic leaves; eerie and gorgeous.36. Alocasia Maharani (‘Grey Dragon’)
A cross between Dragon Scale and Melo; thick silver-gray textured leaves.37. Alocasia Brancifolia
Tall, jagged, deeply segmented leaves resembling a gothic fern.38. Alocasia Harlequin
Extremely rare; mottled variegation and bright pink stems.39. Alocasia Watsoniana
Large, velvety leaves with stark white veins; looks like a giant Frydek.40. Alocasia Scalprum
Small, elongated leaves like dagger blades; compact and unique.41. Alocasia ‘Red Velvet’
Red-tinted petioles with velvety green leaves; dramatic contrast.42. Alocasia Ivory Coast
Pink petioles and clean triangular leaves; easier than Pink Dragon.43. Alocasia ‘Silver Nebula’
Variegated shades of silver and green in a misty, marbled pattern.44. Alocasia Lutea (‘Golden Stem’)
Bright yellow-gold stems with glossy green leaves.45. Alocasia ‘Low Rider’
A dwarf version of macrorrhiza varieties that stays compact.46. Alocasia ‘Serendipity’
Glossy dark leaves, sometimes appearing nearly black.47. Alocasia Jack’s Giant
Huge, hardy outdoor elephant ear variety; can reach 8 feet tall.48. Alocasia Dragon Tooth
Long arrow-shaped leaves with pointed tips and thick texture.49. Alocasia ‘Dark Star’
Hybrid with enormous, semi-velvety purple-green leaves.
50.Alocasia Cucullata (‘Hooded Dwarf’)
Small, heart-shaped leaves; said to bring good luck in some cultures.
BONUS #3
🌿Top 10 Easiest Alocasia for Beginners (With Brief Descriptions)🌿These selections are based on:
✔️ resilience
✔️ lower humidity requirements
✔️ stronger root systems
✔️ fast recovery from stress
✔️ tolerance for moderate light
✔️ fewer pest issues
✔️ predictable growth habits
Let’s dive in!1. Alocasia Amazonica ‘Polly’ / ‘African Mask’
Probably the most common starter Alocasia — and for good reason.
It grows fast, handles medium to bright light, adapts well to homes, and clearly communicates its needs. Easy to find and easy to read.2. Alocasia Wentii
An extremely hardy, forgiving species.
Wentii tolerates lower humidity, cooler temps, and imperfect watering better than most Alocasia. Its purple leaf backs add beauty without the fuss.3. Alocasia Pink Dragon
A crowd favorite.
Pink stems, glossy leaves, and quick growth make this one very beginner-friendly. It’s resilient, tolerant of indoor conditions, and rarely goes fully dormant.4. Alocasia Yucatan Princess
A fast grower with big glossy leaves and rich maroon stems.
It’s less prone to spider mites than velvety species and grows well in standard household humidity.5. Alocasia Odora (‘Night-Scented Lily’)
A tall, sturdy variety that thrives in bright indirect light.
Odora tolerates minor neglect and bounces back easily. Perfect for someone wanting a more dramatic, large-leaf look without the difficulty.6. Alocasia Macrorrhiza (‘Giant Taro’)
Surprisingly beginner-friendly when grown indoors or outdoors in warm climates.It’s hardy, grows quickly, and forgives watering mistakes. Leaves get huge - but care is simple.7. Alocasia Regal Shield
A gorgeous, architectural hybrid.
Dark green leaves, bronze undersides, and strong petioles. It handles indoor conditions very well and is resilient to environmental changes.8. Alocasia Lauterbachiana (‘Purple Sword’)
Narrow, upright leaves and purple backs. This variety tolerates lower humidity, doesn’t require intense light, and is far less sensitive than velvety Alocasia. Excellent for desks or shelves.9. Alocasia Cucullata (‘Buddha’s Palm’)
One of the hardiest Alocasia on earth. Small, heart-shaped leaves and a compact footprint. Cucullata is tolerant of lower light, irregular watering, and household humidity - ideal for beginners.10. Alocasia ‘Tiny Dancer’
Adorable, whimsical, and shockingly easy. It has small, cupped leaves held on slender stems and thrives even in moderate humidity. It's also less prone to pests and doesn’t mind being slightly root-bound.
BONUS #4
🌸Propagating Alocasia via Pollination?🌸
Can it be done?
Yes - but only through successful flowering and seed production.Alocasia do not self-propagate by leaves or stems.Sexual reproduction happens only when:
The plant flowers.
The flower is pollinated at the correct time.
Seeds develop.
Seeds are harvested and grown.This is true genetic propagation, not cloning like pups or corms.
🌿Understanding Alocasia Flowers (Inflorescences)🌿Alocasia produce an aroid inflorescence, not a traditional flower.It consists of:
Spathe – the outer sheath (looks like a petal)
Spadix – the inner spike that holds the flowers
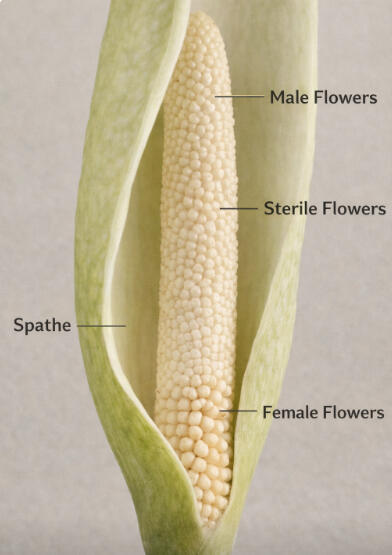
The spadix contains:
Female flowers (lower section)
Male flowers (upper section)
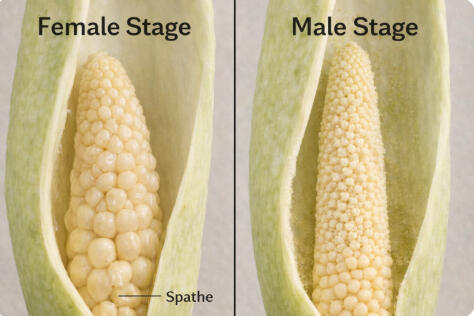
⚠️Important⚠️
These two parts are not receptive at the same time, which prevents self-pollination in most cases.
⏳The Critical Timing Problem (Protogyny)⏳Alocasia are protogynous, meaning:
Female flowers are receptive first.
Male flowers release pollen later.This means:
You usually need two flowers or two plants.
Or you must collect pollen and wait for the female phase of another bloom.This timing challenge is why pollination is uncommon in home settings.
🐝How Pollination Works (Manually)🐝
Step-by-step overview:1) Wait for the female phase.
2) The spathe opens slightly.
3) The lower spadix becomes sticky or moist.
4) This phase lasts only 1–2 days.
5) Apply pollen.
6) Use a soft brush or cotton swab.
7) Apply pollen from another Alocasia flower (or precollected pollen).
Cross-species pollination is possible within the genus.
8) Wait for male phase
Pollen is released in this phase.
You can collect it for future use (freeze it briefly if needed)
9) Seed development
10) If successful, the spathe will close
The spadix thickens and berries form over several months
🍒What Alocasia Seeds Look Like🍒
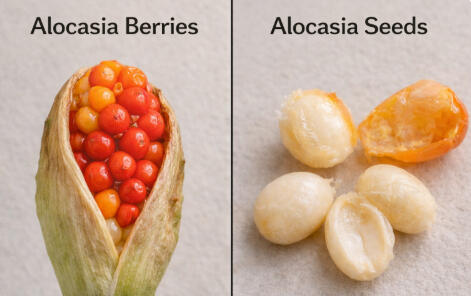
Seeds develop inside small berries.
Berries turn red, orange, or yellow when ripe.
Each berry contains 1–3 seeds.
Seeds are not dormant and must be planted fresh.
🌱Growing Alocasia From Seed🌱Seeds are:
Short-lived.
Sensitive to drying.
Slow-growing.To germinate:
Plant immediately after harvest.
Use sterile, airy medium (moss or fine aroid mix).
Keep warm (75–85°F).
Maintain high humidity.
Expect weeks to months before visible growth.Seed-grown Alocasia:
Grow much slower than corm-grown plants.
Can take years to reach maturity.
May look very different from the parent.🧬Why People Pollinate Alocasia🧬
Pollination is mainly done to:
Create new hybrids.
Introduce new traits.
Produce variegation possibilities.
Preserve rare genetics.
Experiment with breeding.This is how many rare and named hybrids exist today.⚠️Why Pollination Is NOT Common for Most Growers⚠️For everyday plant owners, pollination is impractical because:
Alocasia rarely flower indoors.
Flowering requires mature, healthy plants.
Timing is difficult.
Seed success is inconsistent.
Results are unpredictable.
Growth is very slow.For most people:
Corms and pups are faster, easier, and identical to the parent
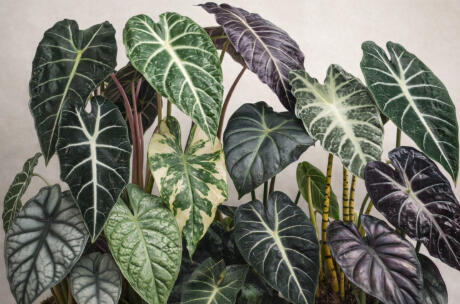
🌱Bottom Line🌱Yes, Alocasia can be propagated by pollination — but it’s an advanced breeding method, not a practical propagation technique for most growers.If your goal is:
More plants - use pups or corms
Identical plants - avoid seeds
Hybridization - pollination is the way
Experimentation - seeds are exciting
BLOG POST TITLE

t
BLOG POST TITLE

Blog Text Body
BLOG POST TITLE

Blog Text Body
BLOG POST TITLE

Blog Text Body
BLOG POST TITLE

Blog Text Body
About Us

Natalie Rudolph - Founder and Green Thumb Pro
Hi, I’m Natalie - tropical plant addict, collector of over 600 leafy roommates, and co-founder of BeLeafInRudolph with my husband, Richard. What started as “just one more plant” turned into a full-blown jungle, and now I spend my days surrounded by rare foliage, quirky plant projects, and way too many grow lights.I’ve been collecting, caring for, and learning about tropical plants for years, and nothing makes me happier than sharing that love with others. Whether I’m selling you your dream plant, teaching you the tricks I’ve picked up through trial (and plenty of error), or just swapping planty dad jokes, I’m all in. Plants are my passion, but people are my purpose - I truly love connecting with fellow collectors, beginners, and curious green thumbs alike.At BeLeafInRudolph, I bring my humor, my heart, and my (sometimes overly honest) plant wisdom to the table. If you’re looking for someone who takes tropical plants seriously - but doesn’t take herself too seriously - then welcome, you’ve found your planty people.

Richard Rudolph - (Self proclaimed) Other Person Involved
Meet Richard - my husband, my rock, and the other half of BeLeafInRudolph. While I was knee-deep in potting mix and plant cuttings long before he joined me, Richard’s love for plants has grown right alongside mine. He didn’t start out obsessed with greenery (someone had to be the voice of reason when 600+ plants started showing up around the house), but over time he’s developed a true appreciation for the hobby - even claiming Alocasias as his personal favorites.Richard is our in-house nerd and research guru. If there’s a plant care method, growth hack, or obscure botanical fact to be found, he’s the one digging deep to uncover it. He balances out my wild enthusiasm with his steady support, thoughtful insights, and just the right amount of dry humor. Together, we make a team that’s passionate about not just growing plants, but also growing a community of plant lovers who can share in the joy.So whether he’s geeking out over plant science or carrying the heavy bags of soil (true love, right?), Richard is a big part of why BeLeafInRudolph exists today.

Our little family!!


🌿 Top 10 Easiest Alocasia for Beginners (With Brief Descriptions)These selections are based on:
✔️ resilience
✔️ lower humidity requirements
✔️ stronger root systems
✔️ fast recovery from stress
✔️ tolerance for moderate light
✔️ fewer pest issues
✔️ predictable growth habitsLet’s dive in!1. Alocasia Amazonica ‘Polly’ / ‘African Mask’Probably the most common starter Alocasia — and for good reason.
It grows fast, handles medium to bright light, adapts well to homes, and clearly communicates its needs. Easy to find and easy to read.2. Alocasia WentiiAn extremely hardy, forgiving species.
Wentii tolerates lower humidity, cooler temps, and imperfect watering better than most Alocasia. Its purple leaf backs add beauty without the fuss.3. Alocasia Pink DragonA crowd favorite.
Pink stems, glossy leaves, and quick growth make this one very beginner-friendly. It’s resilient, tolerant of indoor conditions, and rarely goes fully dormant.4. Alocasia Yucatan PrincessA fast grower with big glossy leaves and rich maroon stems.
It’s less prone to spider mites than velvety species and grows well in standard household humidity.5. Alocasia Odora (‘Night-Scented Lily’)A tall, sturdy variety that thrives in bright indirect light.
Odora tolerates minor neglect and bounces back easily. Perfect for someone wanting a more dramatic, large-leaf look without the difficulty.6. Alocasia Macrorrhiza (‘Giant Taro’)Surprisingly beginner-friendly when grown indoors or outdoors in warm climates.
It’s hardy, grows quickly, and forgives watering mistakes. Leaves get huge — but care is simple.7. Alocasia Regal ShieldA gorgeous, architectural hybrid.
Dark green leaves, bronze undersides, and strong petioles. It handles indoor conditions very well and is resilient to environmental changes.8. Alocasia Lauterbachiana (‘Purple Sword’)Narrow, upright leaves and purple backs.
This variety tolerates lower humidity, doesn’t require intense light, and is far less sensitive than velvety Alocasia. Excellent for desks or shelves.9. Alocasia Cucullata (‘Buddha’s Palm’)One of the hardiest Alocasia on earth.
Small, heart-shaped leaves and a compact footprint. Cucullata is tolerant of lower light, irregular watering, and household humidity — ideal for beginners.10. Alocasia ‘Tiny Dancer’Adorable, whimsical, and shockingly easy.
It has small, cupped leaves held on slender stems and thrives even in moderate humidity. It's also less prone to pests and doesn’t mind being slightly root-bound.
Socials
Join us on PalmStreet for our LIVE crazy chats, exciting auctions, and FREE giveaways!Every Monday @ 5:30 EST